Tutorix Editor User Manual
Version 2.0 /
Copyright © 2002 – 2004 Mindleads Technology
Contents
Install from Installation File
(Download)
Configure Fields of Interaction
Additional Options for Keyboard
Field of Interaction
Change Color and Pattern of Field of
Interaction
Individual Nomination of Single
Steps
Meaning of Icons in Task Description
Window
Welcome Picture / Set Welcome
Announcement
Support codes and
their Significance
Copyright
Copyright © 2002 - 2004 Mindleads Technology. All
rights reserved.
No part of this documentation may be stored in a
retrieval system, transmitted or reproduced in any way, except in accordance with
the terms of the applicable software license agreement. This documentation
contains proprietary information of Mindleads Technology and / or its
suppliers.
Software products of Mindleads Technology or its sales
companies may contain software components of other software producers.
Microsoft®, Windows®, NT® are registered trademarks of
Microsoft Corporation.
Microsoft Agent 2.0 (MS Agent) is a technology of
Microsoft Corporation.
Document Conventions
Icons
Icon Meaning
![]()
|
|
Note |
|
|
Caution |
|
|
Hint |
Typographic
Conventions
Type
Style Description
![]()
|
Example
text |
Characters or words cited according to the user
interface. |
|
Example text |
Symbolizes an exact user input, involving file and
folder names, as well as variable or parameter names. |
|
<Example text> |
Characterizes a variable user input. Characters or
words in pointed brackets are to be replaced in the program by the user
through appropriate entries. |
Preface
Today, transfer of knowledge becomes increasingly
important. Business processes rapidly change, infrastructures are constantly
being modernized – additional knowledge and new skills are needed and must be
accessible to employees in the fastest and most efficient manner. Classical
schooling or generic training manuals are in today’s economical growing demands
barely sufficient. Tutorix sets the pattern for new measures in the area of
electronic learning (e-learning), be it to indoctrinate users in new software
applications or to make business processes accessible to employees in company
wide interactive form.
Tutorix is suitable for continuous studies, as well as
initial training for the implementation of new software solutions.
What is Tutorix?
Tutorix is an innovative and modern tool, which helps
you to create interactive self learning units called tutorials and make them
available to your employees. Your employees aren’t completely alone: By using a
Tutorix compiled learning unit (tutorial), you will be guided through the
entire learning process with a simulated intelligent agent. With the tutorials
your employees will become familiar with new applications and business
processes in the easiest fashion. All workflows may be independently simulated,
without actual learning tools being installed on the employees PC, hence only relevant schooling information will be passed
on.
Tutorix offers various options for the preparation and
distribution of know how corporation wide and amends in an ideal way the
concept of training of your corporation.
A possible use for the Tutorix generated tutorials is
the indoctrination of operation of a new software or
an appointed work process without the help of a human instructor. For the
education of a software product it need not be actually installed by the user
of the tutorial, Tutorix makes the surface of a software
visible for all users through screenshots.
You will find an example of
this on the enclosed CD-ROM, on which the operation of Tutorix, with help of a
tutorial, can be easily learned. If you have downloaded Tutorix from the
internet, you will find additional tutorials for applications of Tutorix under http://www.mindleads.com
A tutorial may be sent via email to all users of a PC
or it may be made available over the network to a variety of users. The
tutorials may be used at work, as well as at home or en route with a laptop.
The user could learn at his own pace and repeat the
units as often as required. The prerequisite for playback of tutorials is only
the installation of the Tutorix Player software on the users
computer.
System Requirements
Hardware
The following hardware equipment is necessary for
installation and use of Tutorix software:
Minimum:
- Pentium
or similar Processor 200 MHz
- 32
MB of RAM for Windows 95/98/ME
- 64
MB of RAM for Windows NT/2000/XP
- 40
MB free disk space for installation
- 80
MB free disk space for the use of Tutorix Editor
- CD-ROM
drive, if you install Tutorix by CD-ROM
- Display
resolution of 800 x 600 pixels, 256 colors
Recommended:
- Pentium
or similar Processor >500 MHZ
- 64
MB of RAM for Windows 95/98/ME
- 128
MB of RAM for Windows NT/2000/XP
- 40
MB free disk space for installation
- >
1 GB free disk space for the use of Tutorix Editor
- Soundcard
for speech output
- CD-ROM
drive, if you install Tutorix by CD-ROM
- Display
resolution of 1024 x 768 pixels, 65536 colors
Software
Tutorix runs on following operating systems:
- Microsoft
Windows 95 B or higher (OSR-2 Release)
- Microsoft
Windows 98
- Microsoft
Windows 98 Second Edition
- Microsoft
Windows Millenium Edition (Windows ME)
- Microsoft
Windows NT 4.0 (SP6 or higher required)
- Microsoft
Windows 2000
- Microsoft
Windows XP
- Microsoft
Windows 2003 Server
![]() Windows NT4 / 2000 / XP / 2003 require computer
administrator rights for installation.
Windows NT4 / 2000 / XP / 2003 require computer
administrator rights for installation.
Install
Tutorix
In general, the installation process runs without
interruption. Depending upon the version of your operating system, it may be
necessary to update some system components. The installation program
automatically detects the required system components and downloads them from the
internet if necessary. If you do not have access to the internet, please
contact the support team of Mindleads Technology.
Install from
CD-ROM
- Close
all windows and/or programs. Insert the Tutorix Editor CD-ROM.
- Wait
until the Tutorix installation software starts. Depending upon your
hardware equipment this process can take from a few seconds up to one
minute.
Install from
Installation File (Download)
- Double click the file TutorixEditor20EN.exe.
- Wait
until the Tutorix installation software starts. Depending upon your hardware equipment, this process can take from a
few seconds up to one minute.
![]() The installation software is
able to detect previous versions of Tutorix. Upon detecting an existing
installation of an older version, an update will be initiated.
The installation software is
able to detect previous versions of Tutorix. Upon detecting an existing
installation of an older version, an update will be initiated.
![]() Before a new installation can be
done, you must quit Tutorix software. If Tutorix Editor or Tutorix Player is
running on your system, close both programs before you continue with a new
installation.
Before a new installation can be
done, you must quit Tutorix software. If Tutorix Editor or Tutorix Player is
running on your system, close both programs before you continue with a new
installation.
Installation
Process
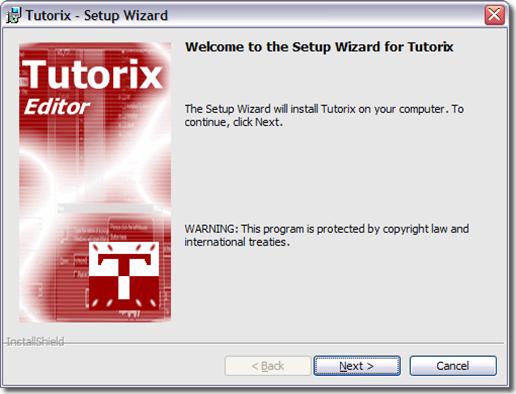
1. The window below appears. Click Next to start the installation process.
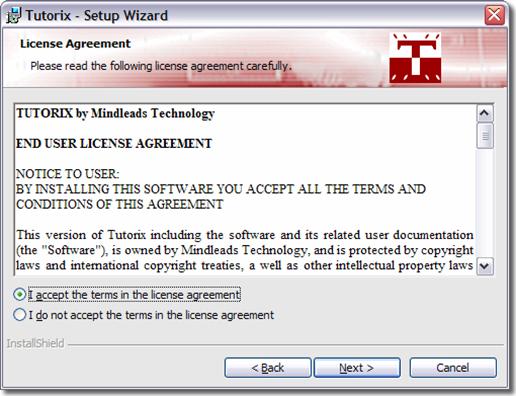
2. Carefully read the license
agreement and select I accept the terms
in the license agreement if you agree to the license conditions.
Click Next to continue.
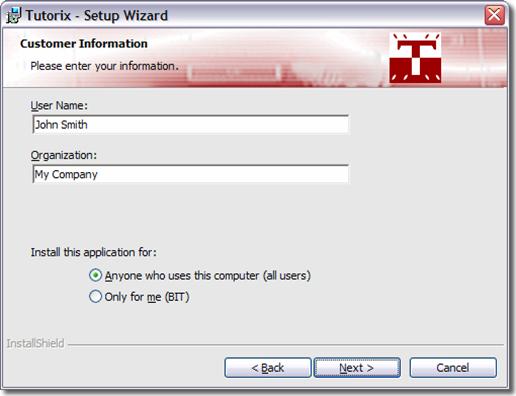
3. Enter your full name and
organization in the text boxes User Name
and Organization.
In general, Tutorix software is installed for all
users. Choose Only for me if you want to install Tutorix only for the currently logged on user.
This provides program icons in the start menu that are not visible for other
users.
Click Next to continue.
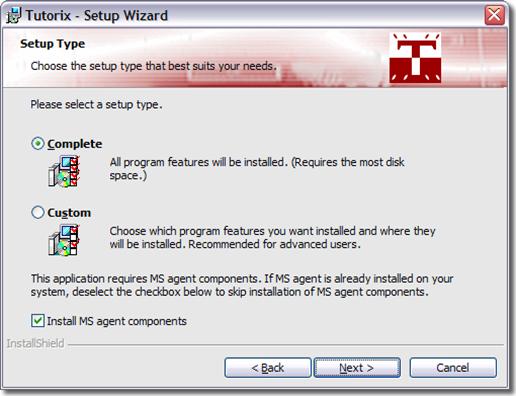
4. You can change the directory in
which Tutorix will be installed. The setup program suggests to
install Tutorix in your default program files folder.
In order to install Tutorix in a different directory,
select Custom and enter the path you
prefer in the next appearing window.
The installation software installs MS agent components
on your system. These are required for the correct function of Tutorix.
Deselect the checkbox under Install MS agent components if you are sure
that they are already installed on your system.
Click Next
to continue.
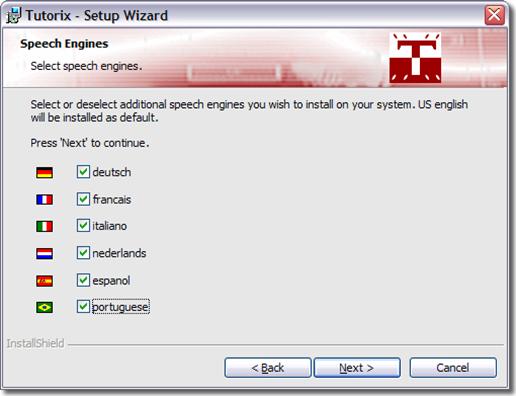
5. Select the desired languages which
you want to use for speech output. You can install any of the following
languages:
·
english (will be
installed as default)
·
german
·
french
·
italian
·
spanish
·
dutch
·
portuguese
Click Next
to continue.
![]() It may occur, that you will be asked during
installation to reboot the system. Click NO on all appearing ‘Restart Windows’
dialogues.
It may occur, that you will be asked during
installation to reboot the system. Click NO on all appearing ‘Restart Windows’
dialogues.
6. Select the agent which you want to
install on your system. The ‘Genie’ Agent will be installed on your system as
default. The following agents are available for selection:

Click Next
to continue.
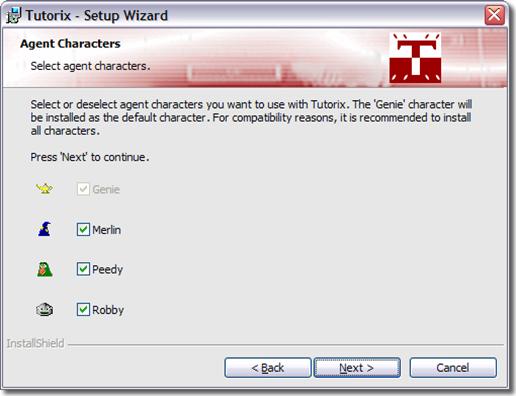
![]() Due to legal license reasons, only four agents are
covered in the software. You may install at any time agents from third party
vendors and utilize them with Tutorix.
Due to legal license reasons, only four agents are
covered in the software. You may install at any time agents from third party
vendors and utilize them with Tutorix.
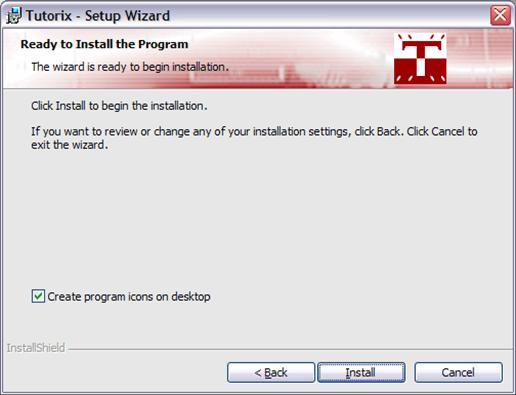
7. The installation software creates
program icons on your desktop. However, if you don’t wish to have them, clear
the checkbox under Create program icons
on desktop.
Click on Install,
to begin with copying data files. Installation may take several minutes.
If the installation program points to a running
program, try to close it.
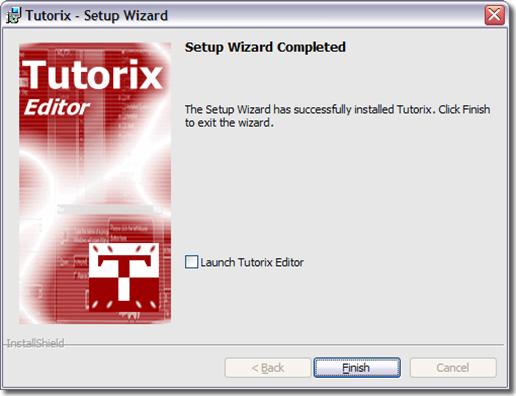
8. Wait until installation has finished and click on Finish.
You now have the choice to start the Tutorix program.
In this case select the checkbox Launch
Tutorix Editor and click on Finish.
Application
of Tutorix
Getting
started
Before you start with recording or editing a tutorial, you shall make
yourself familiar with functions of the toolbar icons. They will ease your work
with Tutorix, since they can be called directly.
Icons Description
![]()
|
|
New. Closes opened tutorials and
prepares Tutorix for the recording of a new tutorial. |
|
|
Open. Opens existing tutorials (.tux
file). |
|
|
Save. Saves newly recorded tutorials
and modifications. |
|
|
Print. Prints an opened tutorial to
the default printer of the system. |
|
|
Cut. Cuts a selected (marked) step
and copies it into the Tutorix cache. |
|
|
Copy. Copies the previously selected
step. |
|
|
Paste. Pastes the cached step below
the selected step. |
|
|
Delete. Deletes the previously selected
step. |
|
|
Record. Prepares Tutorix for the
recording of a new tutorial. |
|
|
Pause. Interrupts temporarily the
current recording of a tutorial. Re-clicking the button continues the
recording process. |
|
|
Stop. Stops the current recording. |
|
|
Play Current Step. Plays the selected step
according to defined attributes under Properties. |
|
|
Plays
the first step of a tutorial (only in Play Mode). |
|
|
Plays
the previous step (only in Play Mode). |
|
|
Plays
the next step (only in Play Mode). |
|
|
Plays
the last step of a tutorial (only in Play Mode). |
|
|
Opens
the properties window (Properties). |
Edit Mode
The Edit Mode serves only for reviewing and
editing a tutorial and correcting or upgrading newly created raw versions of
tutorials.
In the following paragraphs it is explained, which
modifications on tutorials in Edit Mode can be done (i.e. copying steps
of tutorials, pasting or deleting positions, gestures, fields of interaction,
changing text and voice of an agent or naming individual steps of a tutorial).
If you execute steps in Edit Mode according to
the instruction of an agent, they will not be verified by the agent upon
correct execution; this occurs only in Play Mode.
Play Mode
In Play Mode the agent verifies if the
instruction, which is issued to every step, is executed correctly. Upon correct
execution of a step, the agent displays the Edit Mode defined Success
Animation and moves to the next step. If instructions are not executed
correctly, the agent displays the Edit Mode Failure Animation.
The various gestures of the agent are illustrated in
detail in the section Customizing Gestures of the Agent on page 25.
If the agent reports that the step wasn’t executed
correctly, another attempt can be made to execute the instructions correctly.
If you forget the instructions, click the icon Play
current Step ![]() : The agent
will advise you, which mouse or keyboard actions you must execute.
: The agent
will advise you, which mouse or keyboard actions you must execute.
![]() Tutorix consists primarily of two components; Tutorix
Editor and Tutorix Player. The editor comprises the Edit
Mode, which enables recording and editing of a tutorial as well as the Play
Mode, in which the tutorials can be played. The Player serves merely
for playing tutorials by the user.
Tutorix consists primarily of two components; Tutorix
Editor and Tutorix Player. The editor comprises the Edit
Mode, which enables recording and editing of a tutorial as well as the Play
Mode, in which the tutorials can be played. The Player serves merely
for playing tutorials by the user.
Record Tutorials
General
The creation of a tutorial is performed in two major
steps:
· Creating raw version (recording)
· Editing raw version (editing)
After recording a raw version, it must be edited and
adjusted to satisfy the demands of the user. The single interaction steps could
be expanded and the voice output modified and specified.
The fields of interaction which mark the position of a
keyboard input or a mouse click, could be adjusted to
the extent of the actual requirements. In addition, an individual task
description could be added to each of the single steps.
Since the subsequent amendments should not be time consuming, we do
recommend before recording a new tutorial the following:
· ![]() Make sure that the sequence of the recording is known
precisely.
Make sure that the sequence of the recording is known
precisely.
· Go through the entire sequence
without Tutorix and note down, if required, where components of the recording
are to be located. Start all required applications before you begin with the
recording, since during the phase of recording all mouse / keyboard actions
should be kept to a minimum.
·
Consider
recording slowly. If you execute steps too fast, your PC may not have
sufficient resources.
·
Make
sure that your monitor resolution is set for 1024 x 768 pixels, since this
resolution is most appropriate for recording a tutorial.
·
If
you want to create large tutorials (>50 steps), make sure that sufficient
disk space is available. Up to 3 MB could be used temporarily per recorded
step, i.e. your computer must have, for example, for 100 steps, 300 MB disk
space for usage.
![]() Tutorix constantly examines available disk space
during recording and interrupts the recording if disk space is insufficient.
Recording cannot be continued after interruption.
Tutorix constantly examines available disk space
during recording and interrupts the recording if disk space is insufficient.
Recording cannot be continued after interruption.
Recording of Raw
Version
Before you start with recording, select a desired
agent and language for your new tutorial. If you fail to do so, default
language (English) is automatically used and the Default Agent defined
under program settings [Extras, Options] is utilized.
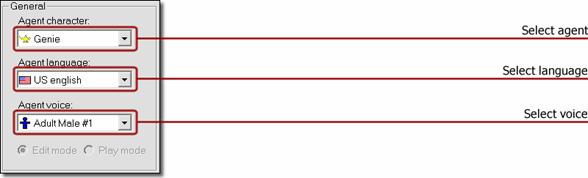
Under ‘Agent Character’ you can choose the desired
agent. By default, four agents are available (Genie,
In the Menu under [Extras, Options, Default Agent] you have the possibility to define one of
the four agents as default. The chosen agent appears everytime
you start Tutorix. The agent is also used for a new recording. Alternatively,
you can select ‘no agent’ (No Character) , hence only the bubble is
displayed.
By clicking on Agent Language, you can
designate the language of the agent (English, German, French, Italian, Spanish,
Dutch or Portuguese). Under Agent Voice you have the possibility to
impart your agent either a male or a female voice. You may even select ‘no voice’, the speech output follows the bubble of the agent.
Before you begin with recording of a new tutorial, make sure that all
open tutorials are closed. Click on the Record icon ![]() or select Record in the
Menu under Extras.
or select Record in the
Menu under Extras.
![]() You have the possibility to continue with an open or
newly created tutorial. This means, the recording will be appended to the
already loaded tutorial. To achieve this, select in the Menu Extras the the item Append.
You have the possibility to continue with an open or
newly created tutorial. This means, the recording will be appended to the
already loaded tutorial. To achieve this, select in the Menu Extras the the item Append.
The below window appears. You have the following
possibilities:
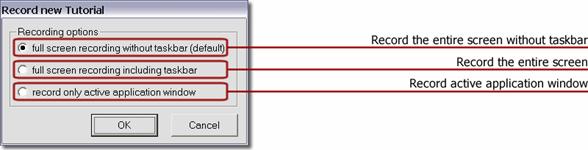
·
Full screen recording
without taskbar records the entire screen without the taskbar.
·
Full screen recording
including taskbar records the entire screen.
·
Record only active
application window records only the used screen, meaning the program
which ought to be recorded.
Click on OK,
to begin recording.
The flashing icon ![]() on the taskbar indicates that the recording
phase has started. Once you click the record icon
on the taskbar indicates that the recording
phase has started. Once you click the record icon ![]() the Tutorix window is
automatically minimized, so that access to the desktop or to open windows can be
provided.
the Tutorix window is
automatically minimized, so that access to the desktop or to open windows can be
provided.
![]() Tutorix records everything
entered by keyboard or mouse from this point on. Therefore, Tutorix records
also passwords and codes as clear text! If your tutorial contains passwords,
make sure that they can be passed on safely or change them retroactively.
Tutorix records everything
entered by keyboard or mouse from this point on. Therefore, Tutorix records
also passwords and codes as clear text! If your tutorial contains passwords,
make sure that they can be passed on safely or change them retroactively.
If you want to interrupt your
recording, click the left mouse button on the flashing icon on the taskbar and
select in the Menu Pause. The flashing icon ![]() will be replaced through a Pause icon
will be replaced through a Pause icon ![]() . During the
pause, Tutorix records no mouse or keyboard actions at all. To end the pause,
re-click the Pause icon
. During the
pause, Tutorix records no mouse or keyboard actions at all. To end the pause,
re-click the Pause icon ![]() on the taskbar. If you maximize the Tutorix
window during the recording phase of a tutorial, the Pause mode will be
activated automatically. After you have recorded the desired production step,
click the Stop icon
on the taskbar. If you maximize the Tutorix
window during the recording phase of a tutorial, the Pause mode will be
activated automatically. After you have recorded the desired production step,
click the Stop icon ![]() , or click
with the left mouse button on the flashing icon
, or click
with the left mouse button on the flashing icon ![]() on the taskbar, followed by Stop, or
select Stop in the Menu under Extras.
on the taskbar, followed by Stop, or
select Stop in the Menu under Extras.
Before you begin post editing, it is recommended to
play the newly recorded tutorial to estimate how many corrections,
modifications or enhancements must be done.
![]() Numerical inputs may not be entered through the numeric pad (numbers on
the right of the keyboard). Use for this purpose the numerical series, located
above the alphabet on the keyboard.
Numerical inputs may not be entered through the numeric pad (numbers on
the right of the keyboard). Use for this purpose the numerical series, located
above the alphabet on the keyboard.
Edit
Tutorials
Before you commence editing,
make sure that Tutorix is set to Edit Mode:
![]()
Rework Raw Version
Reworking of a tutorial
comprises primarily of the following:
- Verify if all steps were executed
correctly
- Adjust the size of fields of interaction
- Optimize the position of the agent
- Adjust modified position of gestures of
the agent
- Change text in bubbles
- Specify steps individually
- Task description
- Short description of the tutorial
Verification of Steps
The steps of your new tutorial are displayed upon
completion of recording in a step tree.
Work through the tutorial step by step (by clicking
with the left mouse button on the appropriate steps) and verify, if the mouse
and keyboard actions are recorded on all steps correctly.
You have the possibility to delete redundant or
duplicate steps, by clicking the icon ![]() or by selecting in the Menu under Step
the item Delete Step.
or by selecting in the Menu under Step
the item Delete Step.
To copy a step, click on the ![]() icon or select in the Menu Step the
item Copy Step.
icon or select in the Menu Step the
item Copy Step.
To cut a step and to copy it into the cache, click on
the ![]() icon or select in the Menu Step the
item Cut Step.
icon or select in the Menu Step the
item Cut Step.
To paste a step, a step must be copied previously. To
paste, click on the ![]() icon or select in the Menu Step the
item Paste Step.
icon or select in the Menu Step the
item Paste Step.
The newly inserted step appears below the selected
steps.
Selecting steps:

![]() Before you are able to copy, cut or delete a step, it
must first be selected (marked).
Before you are able to copy, cut or delete a step, it
must first be selected (marked).
To play the current step, click on the ![]() icon or select
in the Menu Navigation the item Play current Step.
icon or select
in the Menu Navigation the item Play current Step.
To play the next step, click on the ![]() icon or select in the Menu Navigation
the item Play next Step.
icon or select in the Menu Navigation
the item Play next Step.
To play the previous step, click on the ![]() icon or select in the Menu Navigation
the item Play previous Step.
icon or select in the Menu Navigation
the item Play previous Step.
To play the last step of a tutorial, click on the ![]() icon or select in the Menu Navigation
the item Play last Step.
icon or select in the Menu Navigation
the item Play last Step.
To play the first step of a tutorial, click on the ![]() icon or select in the Menu Navigation
the item Play first Step.
icon or select in the Menu Navigation
the item Play first Step.
In the step tree you see under the red arrows a figure
of a mouse ![]() , if a mouse
interaction is stipulated, and an illustration of a keyboard
, if a mouse
interaction is stipulated, and an illustration of a keyboard ![]() , if a
keyboard interaction has been anticipated.
, if a
keyboard interaction has been anticipated.
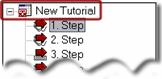
In this example of a step tree, steps are nominated by
default as 1. Step, 2.
Step etc.
In the paragraph Individual Nomination of Single Steps
on page 37 you will learn, how you can rename the steps.
Field Size of
Interaction
Tutorix attempts to automatically measure the movement
of a mouse or keyboard input. If unsuccessful, the default size is used, and
the size of the field of interaction must be reworked. Example:
You have the possibility to click with the mouse on
the pages or edges (below red marked) of the field of interaction and to drag
it into the desired length and width.
To move the fields of interaction as a whole, click on
it and hold the mouse button. Drag the field of interaction with the mouse to
the desired position.
It is recommended to arrange the size of the mouse or
keyboard field of interaction, to correspond with the measures of the recorded
(inactive) area.
In the example above, the field of interaction
contains new the entire marked menu item.
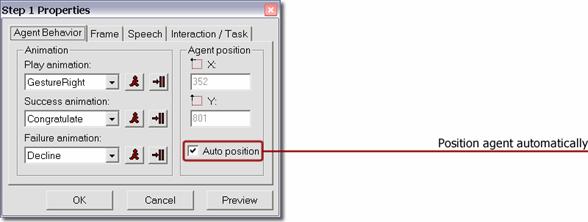
Adjust Position of Agent
The default position (auto position) of your agent is
located on the right hand side of the field of interaction. However, you have
the possibility to change the position of the agent through individual steps.
To change the position of the agent, click with the
left mouse button on the agent and drag it to the desired position. The Auto
Position (default position) of the agent is automatically switched off and you
can now choose the new position of the agent. To restore Auto
Position, select the checkbox Auto Position.
![]()
Don’t forget to fit the gestures of the agent to its
new position.
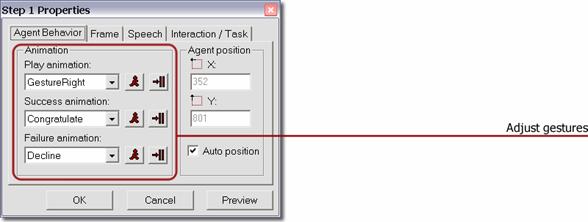
Adjust Gesture Right of Agent
The default gesture of your agent (‘Gesture Right’’,
i.e. pointing with the right arm to the field of interaction) will be utilized
automatically by each step, unless you change it. If the default gesture does
not fit the current position of the agent or you wish to insert in the
individual steps different gestures, click on the Properties ![]() icon of the relevant step and choose the tab Agent
Behavior.
icon of the relevant step and choose the tab Agent
Behavior.
1. Under Play Animation
select the gestures of the agent, that refer the user
in Play Mode.
Below are some of the most used gestures of Play
Animation:


GestureRight GestureLeft
GestureUp
GestureDown
(gesture right) (gesture left) (gesture up)
(gesture down)


Announce Explain -None-
(announce)
(explain) (no gesture)
2. Under Success Animation
select the gesture of agent that should notify the user, when the requested
action from the agent in Play Mode has been successfully executed.
Below are some of the most used gestures of Success
Animation:


Congratulate Greet Wave
(congratulate) (greet)
(wave)
3. Under Failure Animation
select the gesture of agent that should notify the user in Play Mode,
when the requested action from the agent has not been executed correctly.
Below are some of the most used gestures of Failure
Animation:


Decline Confused Sad
(decline) (confused)
(sad)
The Success- and Failure gestures of the
agent are only executed upon playing a tutorial in Play Mode
from Tutorix Editor or by playing a tutorial with Tutorix-Player.
If you wish
to test how a gesture will appear in Play Mode, click the button ![]() (Play Animation).
(Play Animation).
To apply the
selected gesture to all other steps of the tutorial, click the button ![]() (Apply to all Steps).
(Apply to all Steps).
![]() Not all agents from third party vendors have the same
animations in their ‘repertoire’. By selecting the agent, the list of available
animations is automatically updated. If you use an agent from a third party
vendor, it is possible that not all animations are available.
Not all agents from third party vendors have the same
animations in their ‘repertoire’. By selecting the agent, the list of available
animations is automatically updated. If you use an agent from a third party
vendor, it is possible that not all animations are available.
Changing Text in Bubbles
You may customize default texts that are utilized
during recording of a tutorial according to your demands.
Click on the properties icon ![]() and
select the tab Speech.
and
select the tab Speech.
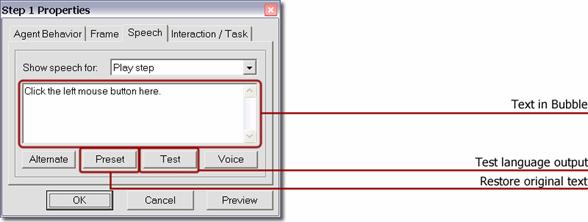
You can now change the text that is displayed in the
bubble. If you then click Test, you can review the new speech output
directly. By clicking Preset, the original text (default template) of
the bubble is restored.
Caution:
The selected agent and the chosen language are stored in the .tux file
when the tutorial is saved. This means that the default agent and default
language are used automatically if the .tux file is opened on a computer where
the selected language has not been installed.
If you created and saved a tutorial for example in
German and the user of the tutorial has not installed ‘German’, the users
speech output will be in English (default language).
![]() However, only default texts in bubbles are translated
automatically. If you have made changes in bubbles in ‘Edit Mode’, they will
(if saved language in .tux file has not been installed on the users computer) not
be translated in default language. This means that you must translate changed
bubble texts into English, if the user of the tutorial has not installed your
chosen language.
However, only default texts in bubbles are translated
automatically. If you have made changes in bubbles in ‘Edit Mode’, they will
(if saved language in .tux file has not been installed on the users computer) not
be translated in default language. This means that you must translate changed
bubble texts into English, if the user of the tutorial has not installed your
chosen language.
Dispense
Bubble Text Randomly
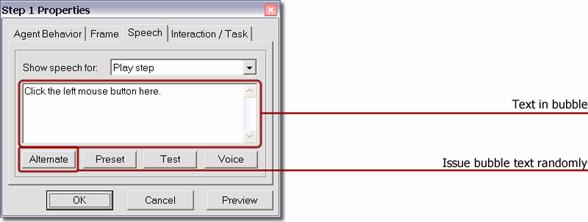
With the Alternate button you can add multiple,
diverse texts to the same bubble text. The texts are separated with the ‘|’
symbol. By playing the bubble text, a text is played randomly. This is to
provide the user more variety in the speech output; i.e. the agent appears
‘lively’.
Example: Click on the continue button to begin with installation.|To
begin with installation click on the continue button.
According to the example above, one of the following
texts are issued randomly:
1) Click on the continue
button to begin with installation.
2) To begin with installation click on the continue button.
Bubble Events
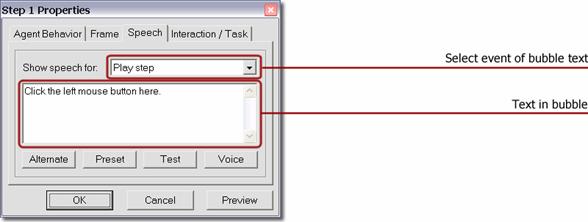
The texts in bubbles are event-dependent. According to
the action of the user, various events are being generated, leading to diverse
speech outputs of the agent. Switch to Play Mode, to test the user
defined bubble texts.
The events correspond to either a mouse or keyboard
interaction. The events are characterized through appropriate symbols. Tutorix
is acquainted with the following events:
![]() Play Step (Play Step)
Play Step (Play Step)
This text is being used for playing a step. Its
purpose is to inform the user, what action will be performed by the appropriate
step.
![]() Outside of Field of Interaction (Outside of Frame)
Outside of Field of Interaction (Outside of Frame)
This text appears in the bubble, if the user has
operated the mouse button outside the field of interaction.
![]() Left Mouse Button Expected (Left mouse button expected)
Left Mouse Button Expected (Left mouse button expected)
The user has made a mouse click within the field of
interaction, but clicked the wrong mouse button. The left mouse button is
expected.
![]() Right Mouse Button Expected (Right mouse button expected)
Right Mouse Button Expected (Right mouse button expected)
The user has made a mouse click within the field of
interaction, but clicked the wrong mouse button. The right mouse button is
expected.
![]() Double- Click Expected (Double-click expected)
Double- Click Expected (Double-click expected)
The user has made a mouse click within the field of
interaction; however, a double click is required.
![]() Incorrect Input (Incorrect input)
Incorrect Input (Incorrect input)
The input in the field of interaction is not correct.
The event is caused, when the input does not correspond with the Interaction
/ Task / Expected User Input field. A variable may be used to
utilize the text that the user has entered into the bubble text field of the
agent.
Example: You have entered %input% instead of notepad.exe
In the example above, the text in the bubble is
adjusted according to the input of the user. If the user has entered word.exe,
the output would be:
You have entered word.exe instead of notepad.exe
![]() Upper and Lower Case Invalid (Case-sensitive input)
Upper and Lower Case Invalid (Case-sensitive input)
This event is caused, if the user has entered input
correctly; however, he has not adhered to case sensitivity. Refer to the
paragraph Configure Fields of Interaction.
![]() Completing Input (Finish input)
Completing Input (Finish input)
This text appears in the bubble if an input must be
completed with a triggerkey. For example it will be
indicated upon (correct) input of
notepad.exe, that the user must press
the Enter key for completion.
![]() Wrong Pressing of Triggerkey (Wrong triggerkey
pressed)
Wrong Pressing of Triggerkey (Wrong triggerkey
pressed)
This event is caused when the user has hit the wrong triggerkey. You may use the variable %key%, to let the wrong
input flow into the bubble text. The users pressed button will automatically be
translated into the particular language. Example:
You have pressed the %key% key instead of the Enter
key, try it once again.
If the user pressed the Escape button for completion,
the text in the bubble would be the following:
You have pressed the Escape key instead of the Enter
key, try it once again.
Configure Fields of Interaction
In Edit Mode you can configure the fields of
interaction of single steps.
This means you can change the requested mouse or
keyboard interaction that must be executed when playing the tutorial in Play
Mode.
Click on the icon Properties ![]() and select the tab Interaction / Task.
and select the tab Interaction / Task.
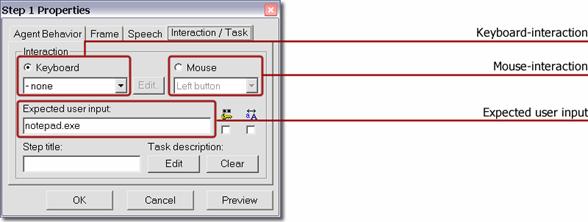
Keyboard
Interaction
If the current step requires a keyboard interaction
(user input and/or triggerkey), the field keyboard is
activated (labeled black button). In the example above, no triggerkey
is required.
The field Keyboard is set for ‘None’. In
contrast, in the field Expected User Input text is written, and must be
entered through the keyboard by this step of the tutorial into the designated
field.
You can now modify both the nature of the triggerkeys, as well as the input text to be entered by the
user. This is useful for example if misspellings have occurred during recording
or if you have forgotten parts of the text or the application of the triggerkey during recording.
![]() By a keyboard interaction, either a triggerkey must be selected or text must be entered or
both.
By a keyboard interaction, either a triggerkey must be selected or text must be entered or
both.
You can define the following triggerkeys:
Escape, Return, Tab, Insert, Delete, Home, End, Page
Up, Page Down,
CtrlA – CtrlZ, Ctrl0 – Ctrl9, F1
– F12
Defining
Multiple Triggerkeys
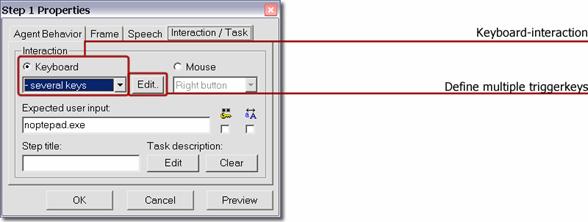
You have the possibility to define multiple triggerkeys, so that the next step can be played if one of
the triggerkeys has been hit. Choose ‘Define Several
Keys’ and click on the Edit button. The following configuration window
appears:
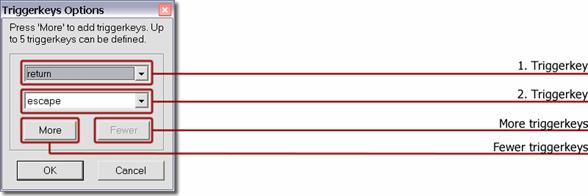
In the example above, two triggerkeys
are defined: Return and Escape.
Click on the ‘More’ button or
‘Fewer’ to expand or reduce the configuration window. You can define up to five different triggerkeys.
Mouse
Interaction
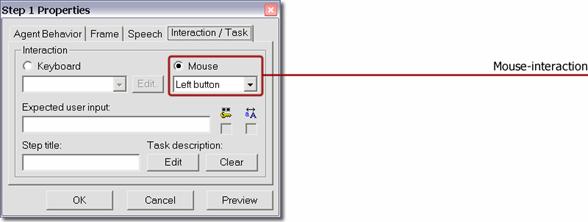
In the example above, a mouse interaction (left mouse
button, right mouse button, double click) is demanded, therefore the field Mouse
is activated. You have the possibility to modify or correct the demanded mouse
action.
Example: During recording you have executed a double-click, although only one click with the left mouse
button was required. This can be corrected easily: Click on the field ‘Mouse’
and select Left click. By playing of tutorials in Play Mode a
mouse click with the left mouse button will now be expected by the relevant
step.
Additional
Options for Keyboard Field of Interaction
If you select in Edit Mode under Properties ![]() and Interaction/Task in the checkbox
and Interaction/Task in the checkbox ![]() Password Field , the input of the text Expected
User Input in Play Mode will be starred i.e. ( ******* ).
Password Field , the input of the text Expected
User Input in Play Mode will be starred i.e. ( ******* ).
By default, in Play Mode the expected text inputs in the
tutorials can be entered in either upper or lower case. If the input of NOTEPAD is expected, the Success-Animation
of the agent could also be made through the input of notepad or nOtEPad.
The input case sensitivity could be enforced optionally.
Select in Edit Mode under Properties ![]() and Interaction / Task the checkbox
and Interaction / Task the checkbox ![]() (Case Sensitive). The user must
enter the text of the relevant step in the predetermined upper and lower case,
to provoke the success animation of the agent.
(Case Sensitive). The user must
enter the text of the relevant step in the predetermined upper and lower case,
to provoke the success animation of the agent.
![]() If
the Case Sensitive function
If
the Case Sensitive function ![]() is clicked, for the current step it is
activated exclusively. All other steps of the tutorial, in which text inputs
are expected, the function remains switched off. The option Password Field
is clicked, for the current step it is
activated exclusively. All other steps of the tutorial, in which text inputs
are expected, the function remains switched off. The option Password Field
![]() and Case Sensitive
and Case Sensitive ![]() could only be clicked, if in the relevant step
a keyboard input is expected. In contrast, if a mouse click is expected, these
options are deactivated.
could only be clicked, if in the relevant step
a keyboard input is expected. In contrast, if a mouse click is expected, these
options are deactivated.
Change
Color and Pattern of Field of Interaction
The fields of interaction in the tutorial may be
further modified. Click on the icon Properties ![]() of a step
and select the tab Frame.
of a step
and select the tab Frame.
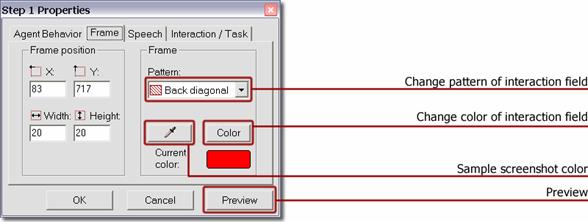
Under pattern a different pattern may be
chosen, to mark the field of interaction. If you don’t wish a patterned field
of interaction, select ‘None’. The field will be bordered but not patterned.
If you separate the fields of interaction of the
individual steps by color or fit the coloring to the current screenshot, you
may appoint on each step of the tutorial the color of the field.
By clicking Color, you may provide the field of
interaction any color. For compatibility reasons with other computers it is
recommended to use one of the 16 default colors.
Besides the 16 default colors, you have under Custom
Colors the possibility to choose any color of the RGB color range.
You may choose in the screenshot an already used
color.
If you click the ‘Sample Colors’ button
![]() , you can
define every color of your screenshot as foreground color for the field of
interaction. Use your mouse to select a color within the screenshot. In the
field Current Color you see a preview of the selected color.
, you can
define every color of your screenshot as foreground color for the field of
interaction. Use your mouse to select a color within the screenshot. In the
field Current Color you see a preview of the selected color.
With the preview button, the relevant field of
interaction receives immediately a new color. This function also serves for
previewing the altered settings.
If you don’t wish a preview of the color, click
directly on the ‘OK’ button. If you want to restore the settings, use the
‘Cancel’ button.
Position
Voice Output
Under ‘Properties’ ![]() select
the tab speech and click on the ‘Voice’ button. The window of voice settings is
opened.
select
the tab speech and click on the ‘Voice’ button. The window of voice settings is
opened.
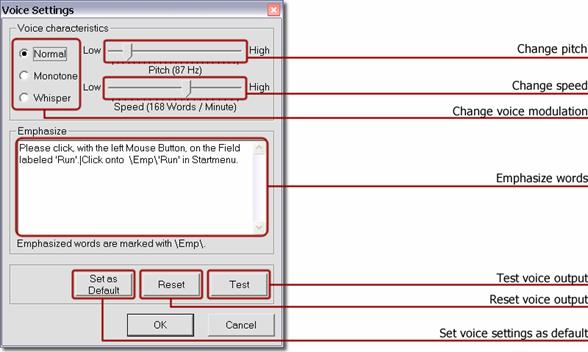
You may change the pitch as well as the speed of your
agent. The modulation of the voice could also be changed, choose between (normal,
monotone and whisper).
You may also emphasize individual words. At least two
or more words in the field ‘Emphasize’ must be defined as voice output,
separated with space characters. Double click the desired word to be emphasized
in the voice output. Emphasized words are displayed graphically through the
directory \Emp\. Re-click the already emphasized word to revoke the
emphasis.
With the ‘Test’ button, all changes performed
in this window can be sampled.
With the button ‘Set as Default’ you may apply changes
of the agent voice to all steps within your tutorial. Existing voice
settings in other steps will be overwritten.
If you click the ‘Reset’ button, all previous
changes are reset, i.e. default values are used again for voice output.
![]() Through the emphasis of words the modulation and
understanding of the voice output can be improved. This function is especially
useful for longer sentences.
Through the emphasis of words the modulation and
understanding of the voice output can be improved. This function is especially
useful for longer sentences.
Individual Nomination of Single Steps
In the default format of a tutorial, individual steps
are indicated with Step1, Step2, etc. It is recommended, to
rename the steps in the newly created tutorial with a step title.
You can do that by reclicking
the button Properties ![]() and selecting the tab Interaction / Task.
and selecting the tab Interaction / Task.
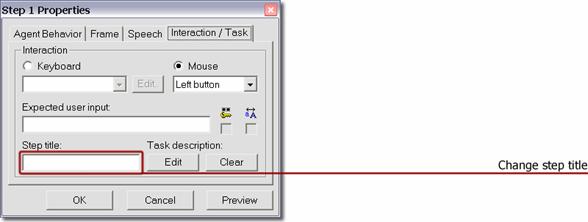
Enter the desired name in the field ‘Step Title’. The
step tree is automatically updated.
If you print the tutorial, the new title of the step
appears instead of the default step description 1. Step, 2. Step etc. under the heading Title
on the print out.
In Tutorix, the changed title of steps appear not only
in the step tree, but also in the status bar ![]() (symbolized as
(symbolized as ![]() ).
).
Additional information in the status bar:
![]()
Amount of Steps Step-Description
(Title) Language Mode (Edit/Play-Mode)
Task
Description
It is recommended to provide the individual steps with
a short description of the current task. The user of the tutorial views this
description automatically by playing the step. If the tutorial is printed, the
short description is viewable under the heading Task Description on the
print out.

By clicking Edit, a new window appears, in
which you can enter a short description for the current step. If you wish to
clear the content of the window Task Description, use the ‘Clear’
button.
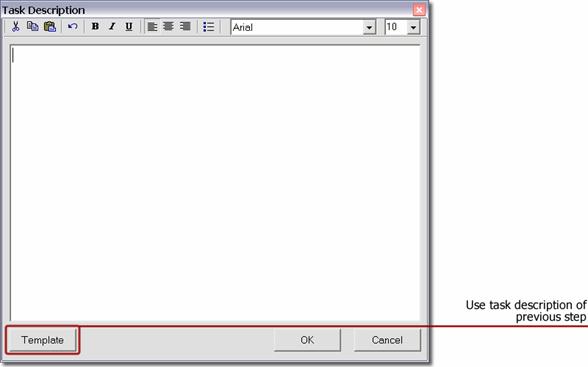
![]() Note the function Template. With this function
you have the possibility to copy the task description of the previous step into
the current description. The copied description can then be modified.
Note the function Template. With this function
you have the possibility to copy the task description of the previous step into
the current description. The copied description can then be modified.
Meaning
of Icons in Task Description Window
![]()
![]()
Cutting
a selected text
![]()
Copying
a selected text
![]()
Pasting
a previously copied text
![]()
Undo
changes
![]()
Bold
![]()
Italic
![]() Underline
Underline
![]() Text
left aligned
Text
left aligned
![]() Text
centered
Text
centered
![]() Text
right aligned
Text
right aligned
![]() Insert
numbers
Insert
numbers
To confirm your new task description, click the OK
button. To restore the original status, use the Cancel button.
Short
Description of Tutorial
Now your created tutorial is almost finished. You can
endorse your tutorial with a short description. Thus you have at any time an
overview of the title, agent, language, author and creation and modification
date of the tutorial.
To create a short description, click in the Menu on File
and select Tutorial Properties or double click in the step tree the
title of the tutorial (in the figure below red framed).
The window below appears. Important attributes of your
tutorial can be entered or reviewed.
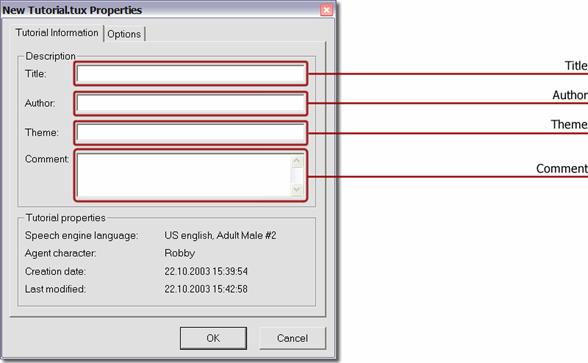
Additional information:
· The language in which your tutorial
was composed
· The agent that you selected
· The date when the tutorial was
created
·
Date
and time of the last modification on the tutorial
![]() This additional information is only available once
your tutorial is saved. It is recommended to give every saved tutorial a title.
This additional information is only available once
your tutorial is saved. It is recommended to give every saved tutorial a title.
Global
Agent Options
You may expand your tutorial with extended settings.
These are applied to the entire tutorial. Select the tab Options.
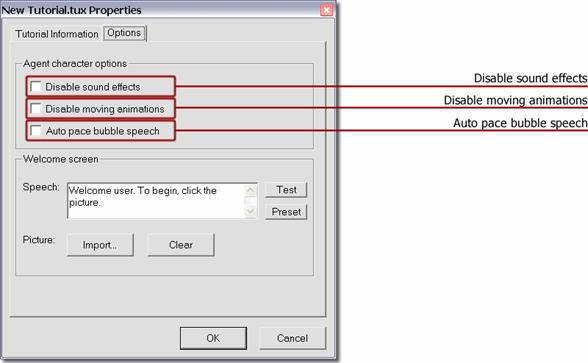
Disable sound effects
These settings disable all effects of the agent. The
speech output remains.
Disable moving animations
With this setting the moving animation of the agent is
disabled, the agent ‘jumps’ between positions.
Auto pace bubble speech
If this option is enabled, the speech output is
synchronized with the appearance of the text in the bubble.
![]()
These settings are saved permanently in the tutorial
and used by Tutorix Player.
Welcome
Picture / Set Welcome Announcement
You tutorial can be enhanced with a picture and/or an
announcement.
Welcome Picture
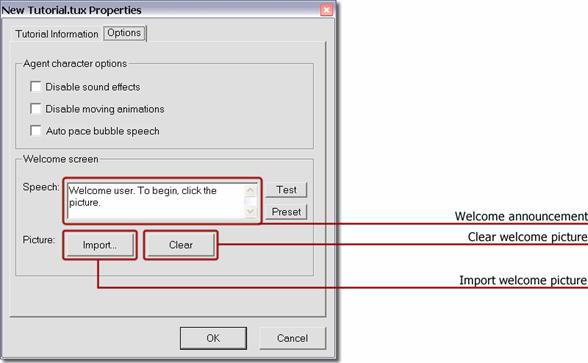
Click the Import button to import a picture to
be used as start screen upon opening a tutorial. With the Clear button
you can delete this picture. The imported picture file size may not be less
than 200 x 100 pixels.
Switch to Play Mode to test the welcome picture.
Welcome Announcement
In the field Speech an additional welcome
announcement can be entered to be displayed in conjunction with the welcome
picture of the agent. The text entered must be language specific, i.e. input
the text in the language that is defined in the tutorial as speech output. With
the Test button the welcome announcement can be tested. Click on Preset,
to return to the default value of the particular language.
Playing Tutorials
Before you play the newly created tutorial, ensure that Tutorix is set
to Play Mode. Once switched to Play Mode, Tutorix plays the first
step automatically.
![]()
The individual steps of the tutorial are displayed in a step tree (see
figure below). Above the 1. Step the
title of the tutorial (.tux file) is mapped.
The individual steps are mapped in the step tree either by default as 1.
Step, 2. Step
etc. or under the title, that was defined in Edit Mode under Interaction
/ Task, Step Title.
To play the tutorial, switch Tutorix to Play Mode. 1. Step
of the tutorial is played automatically. Follow the instructions of the agent.
If the stipulated action is executed successfully, the agent displays the
Success Animation defined gesture and moves to the next step.
If the agent stipulated action was not executed successfully, the agent
displays the Failure Animation defined gesture.
You may execute the called action directly adjacent or if you forgot
what is to be done, click directly on the relevant step in the step tree.
The agent will announce action required.
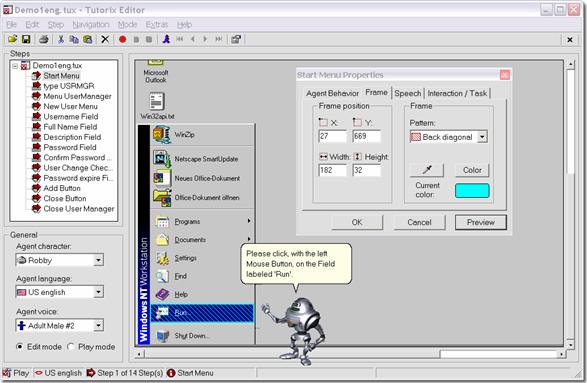
The figure above
depicts the overall surface of the Tutorix Editor. Under Steps can be
seen the individual steps of a demonstration tutorial (Demo1eng.tux). On the
current screenshot the agent demonstrates, the action anticipated from the user
by the 1. Step (Start Menu) of the demonstration tutorial.
The
opened Properties window of the 1. Step (Start Menu Properties)
depicts the pattern (Back Diagonal) and color (under Current
color) the current field of interaction shows. Under General, the
properties of the current selected agent are shown.
Printing
Tutorials
The learning units (tutorials) can be printed.
To print your tutorials, click ![]() (Print) in the Tutorix Editor toolbar. All steps of the tutorial are successively printed
on the default printer of your system.
(Print) in the Tutorix Editor toolbar. All steps of the tutorial are successively printed
on the default printer of your system.
The printout of every step of the tutorial comprises
the following information:
·
Under
the Title you see the Edit Mode defined title of the respective
step. If you did not name the steps in Edit Mode individually, the steps
will be described on the print out as 1. Step, 2. Step etc.
·
Under
Balloon Text the Edit Mode defined instructions of the agent are
shown. If you did not change the text in the bubble in Edit Mode, the
default text is printed.
·
Under
the title Screenshot, the screenshot of the current steps is printed.
·
If
in Edit Mode a task description of the current step was created, this
will appear under the title Task Description on the print out.
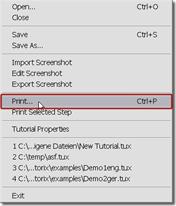
If you want to print the tutorial on another printer,
click in the Menu on File and select the item Print.
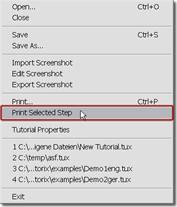
Individual steps of the tutorial can also be printed separately:
Select the desired step of the tutorial and click in the Menu File the
item Print Selected Step.
![]() The commands Print, Edit and Play
can be used directly by clicking in Windows Explorer or on the Desktop with the
right mouse button on the desired .tux tutorial file.
The commands Print, Edit and Play
can be used directly by clicking in Windows Explorer or on the Desktop with the
right mouse button on the desired .tux tutorial file.
Extended Tutorial Settings
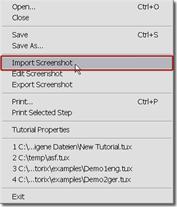
Import
Screenshot
You can import the screenshot of a step into Tutorix
Editor or substitute it with a picture of your choice.
Select the desired step and choose in the Menu (File)
the item Import Screenshot. The following file formats are permitted:
Bitmap (.bmp), JPEG graphic (.jpg), Metafiles (.emf, .wmf), GIF graphic (.gif).
![]() The picture that will replace the
current screenshot may not be less than the minimum size of 640 x 480 pixels,
and not greater than 1600 x 1200 pixels.
The picture that will replace the
current screenshot may not be less than the minimum size of 640 x 480 pixels,
and not greater than 1600 x 1200 pixels.
Edit Screenshot
You may modify or amend the current screenshot with help of a graphic
editing tool according to your needs. Select in the Menu (File) the item
Edit Screenshot.
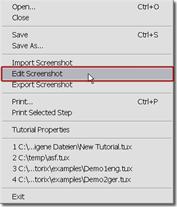
The graphic editing tool ‘Paint’ is opened automatically. After
completing the desired amendment, click on the ‘Close’ symbol ![]() in the corner of the ‘paint’ window.
in the corner of the ‘paint’ window.
The ‘paint window’ is closed and a small window opens with the request
to save. Confirm the modifications on the screenshot with ‘Yes’.
![]() Note that after saving the modified screenshot the original screenshot
is no longer available. However, you have the possibility to back up the
original screenshot before editing in ‘Paint’ with the ‘Export’
function, saving it under a name of your choice as .bmp file.
Note that after saving the modified screenshot the original screenshot
is no longer available. However, you have the possibility to back up the
original screenshot before editing in ‘Paint’ with the ‘Export’
function, saving it under a name of your choice as .bmp file.
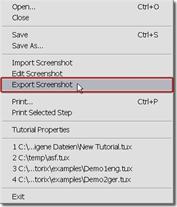
Export Screenshot
With the ‘Export’-function you may save the current
screenshot as graphic file (Windows Bitmap .bmp) in the file system. The
screenshot can also be used independently from Tutorix program.
![]() By this means
you have the possibility to modify or amend the screenshot with graphic editing
tool of choice.
By this means
you have the possibility to modify or amend the screenshot with graphic editing
tool of choice.
![]() With the above described Import function you
can paste the modified screenshot into Tutorix.
With the above described Import function you
can paste the modified screenshot into Tutorix.
Program Settings
Click in the Menu Extras and select Options,
for the Program-Settings window.
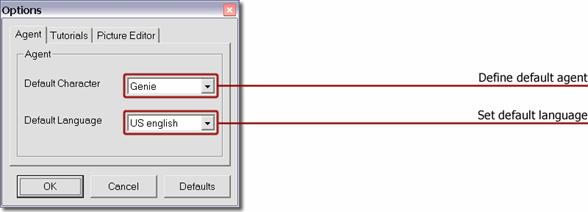
Define Default
Agent
Select in the tab Agent the default agent (Default
Character), to load automatically after every start of Tutorix. If no third
party vendor agents are installed, the choice is limited to the four default
agents (Genie,
![]() To exercise this function thoroughly, you must have
all four default agents installed on your system. You may install missing
agents at any time by inserting the Tutorix CD-ROM and executing the
installation file.
To exercise this function thoroughly, you must have
all four default agents installed on your system. You may install missing
agents at any time by inserting the Tutorix CD-ROM and executing the
installation file.
Set
Default Language
Under Default
Language set the language used upon starting Tutorix. Only installed
languages are possible. Add further languages at any time by inserting the
Tutorix CD-ROM and executing the installation file.
![]()
Click on the Defaults button to return
to the default settings.
Select the tab Tutorials for the below
settings.
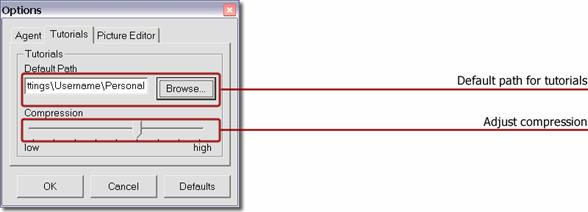
Default
Path for Tutorials
In the field Default Path, the folder in which tutorials are to
be opened or saved is displayed. Use the Browse button to search for
other folders.
Adjust
Compression
Saved tutorials are heavily compressed. The compression is adjusted
under Compression. Adjust the compression range between
1 – 9. The default value is 6.
To obtain smaller files, you may adjust compression to
‘8’ or ‘9’. The time to save tutorials varies according to each computer. With
setting ‘9’, up to 35% smaller files can be attained, compared to the
default-setting ‘6’.
Configure Picture Editor
Select the tab Picture Editor for the image
editor settings.
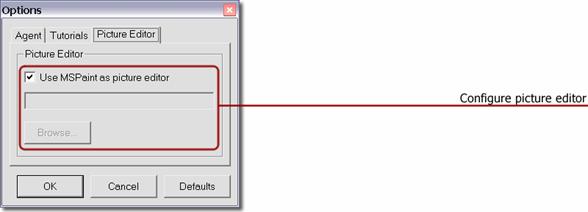
In this configuration window the image editor program that will be used
for editing screenshots is configured. By default, the operating system’s
preinstalled program ‘Microsoft Paint’ is utilized for editing screenshots.
If you would like to use another graphic editing tool for editing image
files, remove the check mark under Use MSPaint as
picture editor. Use the Browse button to search for the desired
graphic editing tool in the file system.
Technical
Information
File
Format
Tutorix utilizes its own file format with the
extension ‘.tux’. These files can only be edited and used with Tutorix
Editor and Tutorix Player.
The file could comprise from a few kilobytes (KB) up
to several megabytes (MB). The size of the file depends on the following
factors:
·
Amount
of steps
·
Image
information
·
Images
in the step specifications
·
Images
in recorded program/programs
·
Background
image on the Desktop
·
Used
screen resolution
·
Compression
![]() You obtain noticeable smaller files,
if you remove an elaborate background image from the Desktop.
You obtain noticeable smaller files,
if you remove an elaborate background image from the Desktop.
Command
Line Parameters
The following command line
parameters are available:
/o <.tux File> opens
a tutorial in Edit Mode
/l <.tux File> opens a tutorial in Play Mode,
plays the first step
/p <.tux File> prints a tutorial
/? calls command
lines help dialog
Example:
"C:\Program Files\Mindleads Technology\Tutorix\TutorixEditor.exe" /o
c:\Files\Tutorials\Tutorial1.tux
![]() If the quoted file path contains space characters, the
path must be denoted in quotes <"Path">.
If the quoted file path contains space characters, the
path must be denoted in quotes <"Path">.
Change Default Voice Output
You may change the default language defaults that are
used for recording a tutorial and customize it according to your needs.
Open the registry database editor regedit.exe.
[START / Run / regedit.exe]
The speech output defaults are saved under the
following key:
HKEY_LOCAL_MACHINE
\SOFTWARE\Mindleads Technology\Tutorix\SpkPresets\<Language>
The format is the following:
[<Language>]
0 = <Tutorial
salutation-text>
1 = <Keyboard interaction,
input announcement> 1.part
2 = <Keyboard interaction,
input announcement > 2.part
3 = <Keyboard interaction,
input announcement with triggerkey> 2.part
4 = <Keyboard interaction,
only triggerkey> 1.part
5 = <Mouse interaction,
announcement left mouse button>
6 = <Mouse interaction,
announcement right mouse button>
7 = <Mouse interaction,
announcement double click>
8 = <Keyboard interaction,
input announcement with triggerkey / only triggerkey> 2.part
9 = <Mouse interaction,
error: outside field of interaction>
10 = <Mouse interaction, error: left mouse button expected>
11 = <Mouse interaction, error: right mouse button expected>
12 = <Mouse interaction, error: double click expected>
13 = <Keyboard interaction, error: invalid input> 1.part
14 = <Keyboard interaction, error: invalid input> 2.part
15 = <Keyboard
interaction, error: case insensitivity> 1.part
16 = <Keyboard interaction, pointer input closure> 1.part
17 = <Keyboard interaction, pointer input closure> 2.part
18 = <Keyboard interaction, error wrong triggerkey>
1.part
19 = <Keyboard interaction, error wrong triggerkey>
2.part
20 = <Keyboard
interaction, error: case insensitivity> 2.part
Customize the paragraph of the desired language
accordingly. Some entries have dependency on others; they are quoted above with
1. Part or. 2. Part.
![]() A faulty alteration of the speech output could lead to
incorrect function of Tutorix. The default can be restored by the ‘Repair’
option of the Tutorix installation program.
A faulty alteration of the speech output could lead to
incorrect function of Tutorix. The default can be restored by the ‘Repair’
option of the Tutorix installation program.
Required
Files
Files that are required for starting and utilizing Tutorix
software:
|
File Name |
Path |
Version |
|
Agentctl.dll |
<C>:\system\Msagent |
2.00.0.2115 |
|
Asycfilt.dll |
<C>:\system\system32 |
3.50.5007 |
|
Comcat.dll |
<C>:\system\system32 |
4.71 |
|
Comdlg32.ocx |
<C>:\system\system32 |
6.00.8418 |
|
Imagehlp.dll |
<C>:\system\system32 |
4.00 |
|
Mscomct2.ocx |
<C>:\system\system32 |
6.00.8804 |
|
Mscomctl.ocx |
<C>:\system\system32 |
6.00.8862 |
|
Msderun.dll |
<C>:\system\system32 |
6.00.8804 |
|
Msvbvm60.dll |
<C>:\system\system32 |
6.00.8964 |
|
Oleaut32.dll |
<C>:\system\system32 |
3.50.5007 |
|
Ole32pro.dll |
<C>:\system\system32 |
5.0.5007 |
|
Riched32.dll |
<installation directory> |
4.00.993.4 |
|
Richtx32.ocx |
<C>:\system\system32 |
6.00.8804 |
|
Shlwapi.dll |
<C>:\system\system32 |
6.00.2462.0000 |
|
TuxAcknow.dll |
<installation directory> |
1.0.0.0 |
|
Stdole2.tlb |
<C>:\system\system32 |
3.50.5007 |
|
TutorixEditor.exe |
<installation directory> |
<current> |
|
TutorixPlayer.exe |
<installation directory> |
<current> |
|
TuxCompress32.dll |
<installation directory> |
2.3 |
|
TuxDecompr32.dll |
<installation directory> |
5.41 |
|
TuxHook.dll |
<installation directory> |
<current> |
|
Vb5db.dll |
<C>:\system\system32 |
6.00.8169 |
Registry
Settings
Key:
[HKEY_LOCAL_MACHINE\SOFTWARE\Tutorix\maxsteps]
Format:
“<Value>”
Default:
1000
Type:
DWORD
With this registry entry, the maximum number of steps can be specified.
The greater the value, the greater the resources required by your computer. The
smallest possible value is 100, the greatest possible 10'000. By default, the value
is set for 1000. Increase the value only if you want to record over 1000 steps
in a tutorial.
![]() Increasing this key greatly increases resource consumption. A value of
10'000 would require a minimum of 256MB Ram.
Increasing this key greatly increases resource consumption. A value of
10'000 would require a minimum of 256MB Ram.
Key: [HKEY_LOCAL_MACHINE\SOFTWARE\Tutorix\recinterval]
Format:
“<Value>”
Default: 600
Type: DWORD
The Tutorix software overrides an internal system power monitor.
Recording tutorials requires a lot of resources, (both hard disk and memory).
If your computer reaches its resources limit during recording, you
receive a message to record slower.
With the registry
entry ‘recinterval’ you can adjust the minimum time
in milliseconds (ms) between generation of
screenshots, to avoid this message. By default, the value is at 600 ms. It is recommended to retain this value. However, on fast
computers the value could be reduced.
The possible range is 250 (¼ second) to 3000 (3 seconds)
Key: [HKEY_LOCAL_MACHINE\SOFTWARE\Tutorix\AgentPath]
Format:
“\<Path>”
Default: “\msagent”
Type: String
Normally the MS Agent software is installed in the
subdirectory ‘msagent’ of the Windows system folder.
To install in a different location, alter this registry entry.
![]() The defined path must be a subdirectory of the Windows
system folder (for example ‘C:\windows’).
The defined path must be a subdirectory of the Windows
system folder (for example ‘C:\windows’).
Key:
[HKEY_LOCAL_MACHINE\SOFTWARE\Tutorix\Characters\<Agent>]
Format:
“<Name of Agent>”
Default:
“Al”, Value 5
“Athena”, Value 36
“Charlie”, Value 25
“Check”, Value 5
“Claude”, Value 5
“Gar”, Value 24
“Genie”, Value 45
“Hanz”, Value 25
“
“Oscar”, Value 15
“Ozzar”, Value 10
“Plany”, Value 14
“Robby”, Value 50
“Santa”, Value 10
“Wartnose”, Value 45
Type: String
According to size and form of the agent, the movement of the hand may
not point to the same position. The following illustration depicts this:
The agents are preset so they point automatically to the correct
position. According to the agent, corrections necessary are calculated by
Tutorix automatically. This is ‘y-Axis Offsetting’.
In the list above you will see the agents stored in the registry
database. The four agents distributed with the Tutorix software (Robby, Peedy,
If an agent from a third party vendor does not
point to the right position and the name of the agent is not yet recorded in the
registry database, you could relate this to an existing registry entry. The
maximum value is 100 pixels. The offset will be made on the y-Axis relative to
the boundary above, i.e. if you change an existing agent from the setting 10 to
20, Tutorix will move the agent upon the next start 10 pixels further down.
Support codes and their Significance
Note: To obtain technical support for Tutorix, select
in the Menu Help item Online Support. You require a connection
to the internet to make use of this function.
Reason: No .acs file
in MS Agent path was located [..\chars\].
Solution: Start
the installation file TutorixEditor20EN.exe, select the checkbox item Repair.
Ensure that in the path [‘..\windows-folder\msagent\chars\] a minimum of one .acs
file is located.
Reason: The
selected assistant was unable to load. The relevant .acs
file may be damaged.
Solution: Start
the installation file TutorixEditor20EN.exe, select the menu item Repair.
Reinstall the assistant. If it is an assistant of a third party vendor,
reinstall it.
Reason: The
speech engine ‘American English TTS’ was unable to load.
Solution: Start
the installation file TutorixEditor20EN.exe, select the menu item Remove.
Start a new installation of Tutorix. Ensure that the ‘L&H TruVoice American English TTS Engine’ is correctly
installed.
Reason: Unable
to load speech engine presets.
Solution: Start
the installation file TutorixEditor20EN.exe, select the menu item Repair.
Reason: The
selected assistant was unable to load.
Solution: Start
the installation file TutorixEditor20EN.exe, select the menu item Repair.
Ensure that the MSAgent 2.0 software is installed
correctly.
Reason: A
screenshot file may be damaged.
Solution: Import
a new image file.
Reason: The
interaction control was not compiled correctly.
Solution: Check
all settings in your tutorial. Pay special attention to the bubble and
interaction settings.
Support code: Tx507
Reason: During
copy-paste function an error occurred.
Solution: Copy
an arbitrary step and paste the newly created step onto any step. Save the
tutorial and reopen it.
Reason: The
tutorial was not able to be saved in the specified path: The path may be
invalid or the appropriate path authorization is missing, or in the temporary
folder there is insufficient hard disk space.
Solution: Ensure
that in the temporary folder (usually [C:\windows\temp] or [C:\temp]) and the
specified path has sufficient space. Check the path is valid. Try to save the
file in a different location.
Reason: Another
application monopolizes the temporary folder of Tutorix.
Solution: Close
all programs that could use the temporary folder. Close ‘Windows Explorer’.
Reason: An
error has occurred during initialization of the tutorial. The file could be
damaged.
Solution: If
this is a newly recorded tutorial, compile it again.
Reason: An
attempt to record an invalid function was made.
Solution: Start
a new recording and try to record it more slowly.
Reason: The
selected file may be invalid or damaged.
Solution: Select
a valid tutorial file.
Reason: The
interactions control file could not be located in the cited tutorial file.
Solution: Select
a valid tutorial file.
Reason: The
interactions control file or the global characteristics could not be
initialized. The tutorial may be faulty.
Solution: Select
a valid tutorial file.
Support code: Tx515
Reason: The
speech output presets file could not be initialized.
Solution: Start
the installation file TutorixEditor20EN.exe, select the menu item Repair.
Reattempt after restarting your system.
Reason: By
attempting to open the selected tutorial an error has occurred.
Solution: Contact
the Mindleads Technology support team.
Reason: The selected tutorial was not able to be overwritten due to
write protection or the required authorizations are missing.
Solution: Ensure that the file is not write
protected and sufficient authorization is enacted to overwrite the file.
Reason: The selected tutorial was not able to be overwritten due to
write protection or the required authorizations are missing.
Solution: Ensure that the file is not write
protected and sufficient authorization is enacted to overwrite the file.
Reason: Unable to copy the selected step. It is possible that there
is insufficient disk space.
Solution: Ensure that on the hard disk where the temporary folder is
located, sufficient hard disk space is available.
Reason: Unable to delete the selected step.
Solution: Save the changes and close the tutorial. Reattempt after
opening the tutorial.
Reason: Unable to insert the selected step. It is possible that
there is insufficient disk space.
Solution: Save the tutorial and reopen it. Ensure that in the temporary
folder there is sufficient disk space.
Reason: The file passed as a parameter, was not located.
Solution: Ensure that the file exists in the specified path. If it is a
networking resource, confirm the UNC path is quoted correctly. Example:
TutorixEditor.exe /o ”\\server\share\folder\file.tux“
Reason: The available disk space in the temporary folder has fallen
below the 10 MB limit.
Solution: Delete the files that are no longer required or use a
temporary folder on a different partition where more disk space is available.
To change the path of the temporary folder, do the following:
Adjust in [Start/Settings/Control
Panel/System/Environment] the variable ‘TEMP’ and ‘TMP’ accordingly.
Reason: The selected image file is not supported by Tutorix or may
be damaged.
Solution: Ensure that files to be imported are either
.jpg, .gif, .bmp, .wmf or .emf.
To verify whether it is a valid image file, open it in Microsoft Paint.
[Start/Programs/Accessories/Paint]
Reason: An
error has occurred during the import of an image.
Solution: Ensure that no other program is using the import file.
Reason: The image file could not be overwritten, because it is
write protected or is still in use by another program.
Solution: Ensure that no other program is using the image file to be
overwritten. Confirm that the file is not write
protected and sufficient authorization is enacted to overwrite the file.
Reason: An error has occurred when exporting an image file.
Solution: Close Tutorix and all opened programs. Reattempt it after
restart of Tutorix.
Reason: Microsoft Paint could not be located. The key in the
registry to MS Paint does not exist or invalid.
Solution: Ensure that MS Paint was installed correctly. Confirm that
the registry entry in
[HKEY_CLASSES_ROOT\Paint.Picture\protocol\StdFileEditing\server\
(Default)] exists and the
path to ‘mspaint.exe’ is valid.
Support code: Tx529
Reason: ‘mspaint.exe’
could not be located.
Solution: Ensure that MS Paint was installed
correctly and that the registry entry in
[HKEY_CLASSES_ROOT\Paint.Picture\protocol\StdFileEditing\server\
(Default)] exists. The value
must include the complete path to ‘mspaint.exe’. Example:
[C:\WINNT\System32\mspaint.exe]
Reason: An
error has occurred when attempting to edit an image file.
Solution: Save the tutorial, close Tutorix and retry after restart of
Tutorix.
Reason: An attempt was made to start Tutorix twice.
Solution: Only one instance of Tutorix can be started.
Reason: In the program path of Tutorix (usually [C:\Program
Files\Mindleads Technology\Tutorix\]) one or more of the following files are
missing or damaged:
·
TuxHook.dll
·
TuxCompress32.dll
·
TuxDecompr32.dll
Solution: Start
the installation file TutorixEditor20EN.exe, select the menu item Repair.
The missing files are automatically copied if required.
Reason: The temporary folder was not located.
Solution: Ensure that the environment variable is correct. Do the
following: [Start/Settings/Control Panel/System/Environment], customize the
variables ‘TEMP’ and ‘TMP’ accordingly.
Reason: Another application has attempted to use the temporary
Tutorix folder.
Solution: Close programs that display the contents of the temporary
folder, i.e. ‘Windows Explorer’.
Reason: There is insufficient disk space.
Solution: To start Tutorix, a minimum of 80MB free disk space is
required. Delete unneeded files or see support code ‘Tx523’.
Support code: Tx536
Reason: The Microsoft agent is not installed correctly. The file
‘Agt0409.dll’ was not located in the MS agent path.
Solution: Start
the installation file TutorixEditor20EN.exe, select the menu item Repair. Ensure that the file ‘Agt0409.dll’ exists in the
agent path [C:\<windows- directory>\msagent\intl\].
Reason: The screen resolution is outside of Tutorix valid range.
Solution: The screen resolution must be a minimum of 800 x 600 pixels
and may not exceed 1600 x 1200 pixels.
Restart Tutorix and click ‘Yes’, if Tutorix requests
that you adjust the screen resolution.
Reason: Tutorix
is not installed correctly. One or more keys in the registry database are missing.
Solution: Start the
installation file TutorixEditor20EN.exe, select the menu item Repair. The missing registry keys are
automatically recovered.
Reason: The
registry database defined Agent folder could not be located.
Solution: Attempt
a new installation of Tutorix. Verify the registry key
[HKEY_LOCAL_MACHINE\SOFTWARE\ Tutorix\AgentPath]
points to an existing folder. Normally it is <windows dir>\msagent.
Reason: The
recording environment could not be initialized correctly.
Solution: Restart
Tutorix. Close all programs not mandatory for recording. Ensure that the
temporary folder on the system partition is not opened with Windows Explorer.
Reason: The
standard defined agent was not located.
Solution: Confirm
the standard defined agent (Extras / Options / Default Agent), in the folder
[<Windows-Path>\<MSAgent Path>\Chars]
exists and you have the required authorization. Start the
installation file TutorixEditor20EN.exe, select the Menu item Repair.
Reinstall the
default agent.