UltraLogon User Manual
Version 3.50 / 04/15/2009
Copyright © 2006 – 2009 Mindleads Technology
Contents
Copyright....................................................................................................................................... 3
Document Conventions................................................................................................................... 4
Icons............................................................................................................................................. 4
Typographic Conventions................................................................................................................ 4
Introduction................................................................................................................................... 5
System Requirements..................................................................................................................... 6
Hardware...................................................................................................................................... 6
Software........................................................................................................................................ 6
Install UltraLogon........................................................................................................................... 7
Install from CD-ROM....................................................................................................................... 7
Install by Archive File..................................................................................................................... 7
Installation Process......................................................................................................................... 8
Getting Started............................................................................................................................. 16
Configure UltraLogon.................................................................................................................... 18
Setup Ini Files.............................................................................................................................. 18
Ini File stored locally or on
network drive....................................................................................... 19
Ini File stored on Web Server........................................................................................................ 20
Ini File Group Configuration
File..................................................................................................... 21
Create UltraLogon
Configuration File.............................................................................................. 21
Custom ini file setup...................................................................................................................... 22
Using UltraLogon.......................................................................................................................... 24
Change System View.................................................................................................................... 25
Create Favorites........................................................................................................................... 28
Maintain Favorites........................................................................................................................ 29
General
Settings........................................................................................................................... 29
System
Settings............................................................................................................................ 29
User
Settings................................................................................................................................ 30
Application
Settings....................................................................................................................... 30
Additional Functions...................................................................................................................... 31
Quick
Connect.............................................................................................................................. 31
Transaction
Browser..................................................................................................................... 31
Web
Access................................................................................................................................. 32
Ini File Editor................................................................................................................................ 33
Edit
SAP System........................................................................................................................... 34
System
Settings............................................................................................................................ 34
Language
Settings........................................................................................................................ 35
SNC
Settings................................................................................................................................ 36
Web
Access................................................................................................................................. 36
Sort
Systems................................................................................................................................ 37
Add,
Copy, Delete Systems............................................................................................................ 37
Disable
Systems / System Message................................................................................................ 37
Ini
File Properties......................................................................................................................... 38
Publish Ini Files to Web
Server....................................................................................................... 39
Configure
Web Access................................................................................................................... 39
Access
Types............................................................................................................................... 39
FTP
Access.................................................................................................................................. 39
Publish
Ini File.............................................................................................................................. 40
Ini File Groups.............................................................................................................................. 40
Create
Configuration File............................................................................................................... 41
Program Options........................................................................................................................... 42
Low
Speed Connection.................................................................................................................. 42
Activate
Trace Mode..................................................................................................................... 42
General
Options............................................................................................................................ 42
Installation Notes for
Administrators............................................................................................... 44
Technical Information................................................................................................................... 45
Command Line Options................................................................................................................. 45
Required Files.............................................................................................................................. 46
Registry Settings........................................................................................................................... 46
Copyright
Copyright © 2009 Mindleads Technology. All rights
reserved.
No part of this documentation may be stored in a
retrieval system, transmitted or reproduced it in any way, except in accordance
with the terms of the applicable software license agreement. This documentation
contains proprietary information of Mindleads Technology and / or its
suppliers.
Software products of Mindleads Technology or its sales
companies may contain software components of other software producers.
Microsoft®, Windows®, NT®, EXCEL®, Word® and
PowerPoint® are registered trademarks of Microsoft Corporation.
Adobe®, Acrobat®, Acrobat PDFWriter®, Acrobat Distiller®
and Postscript® are registered trademarks of Adobe Systems Incorporated.
IBM® and Lotus® are registered trademarks of International Business
Machines Corporation.
Intel® and Pentium® are registered trademarks of Intel Corporation.
WordPerfect® is a registered trademark of Corel Corporation.
UNIX® is a registered trademark of Open Group.
Mac OS®, Macintosh® are registered trademarks of Apple Computer
Incorporated.
SAP®, R/3®, mySAP®, mySAP.com®, xApps®, xApp®, SAP NetWeaver® are the trademarks or registered trademarks of SAP AG
in
HTML, XML, XHTML sind eingetragene Marken des W3C®, World Wide Web
Consortium, Massachusetts Institute of Technology.
Document Conventions
Icons
Icon Meaning
![]()
|
|
Note |
|
|
Caution |
|
|
Tip |
Typographic
Conventions
Type Style Represents
![]()
|
Example text |
Characters or
words cited according to the user interface. |
|
Example text |
Symbolizes an
exact user input, for example file names, folder names, variable names or
parameter names. |
|
<Example text> |
Characterizes a
variable user input. Pointed brackets indicate that you replace these words
or characters with appropriate entries. |
Introduction
UltraLogon represents a direct
replacement for SAP Logon. UltraLogon offers many new features and benefits
that standard SAP Logon program can not provide. UltraLogon ensures optimal
client integration in your SAP system landscape.
Release or hardware updates to
SAP systems require the continued reallocation of the SAP Logon ini file. This
takes high organizational and administrative effort; as a result SAP client
access data are not always up to date. It is also often necessary to update the
services file, which is located in Windows operating system. In most cases end
users are not able to maintain the services file.
With UltraLogon the
distribution of the SAP Logon ini file becomes unnecessary. The file is
centrally stored on web server, thus the client is constantly up to date.
Another benefit of UltraLogon is that the maintenance of the services file
becomes obsolete. UltraLogon features an internal cache which ensures a trouble
free work even when networks interruptions occur.
Companies with large SAP
system landscape have often complex SAP Logon ini files. UltraLogon eases the
work by displaying only SAP systems relevant to the end user. Although all user
access to the same SAP ini file distribution server, each user group can have
its own saplogon.ini file. A constant reallocation of the ini file is omitted.
System Requirements
Hardware
The following hardware equipment is necessary for
installation and use of UltraLogon software:
Minimum:
- Pentium or similar Processor 333 MHZ
- 128 MB of RAM
- 50 MB free disk space for installation and use
- CD-ROM drive, if you install UltraLogon by CD-ROM
- Display resolution of 800 x 600 pixel, 256 colors
- Network card
Recommended:
- Pentium IV or similar Processor 2 GHZ or higher
- 512 MB of RAM or more
- 1 GB free disk space for installation and use
- CD-ROM drive, if you install UltraLogon by CD-ROM
- Display
resolution of 1024 x 768 pixel, 65536 colors
- Network card
Software
UltraLogon runs on the following operating systems:
- Microsoft Windows Millenium Edition (Windows ME)
- Microsoft Windows NT 4.0 (SP6 oder höher erforderlich)
- Microsoft Windows 2000
- Microsoft Windows XP
- Microsoft Windows 2003 Server
- Microsoft Windows
Additional software:
- SAPGUI win32 Release 4.6d or higher
- Internet Explorer 4.0 or higher
- If you make use of SNC (Secure Network Connection), SAPGUI 6.20
Patch 33 or higher is required
Recommended SAPGUI Version: SAPGUI 6.20 Patch 64 or
higher
![]()
Windows NT4 / 2000 / XP / 2003 /
Install UltraLogon
Normally, the installation process
runs without interruption. Depending on the version of your operating system,
it may be necessary to update some system components. The installation program
automatically detects the required system components and downloads them from
the internet if necessary. If you do not have access to the internet, please
contact the support-team of Mindleads Technology.
Install from
CD-ROM
- Close all windows and /or programs. Insert the UltraLogon CD-ROM.
- Wait until the UltraLogon installation-software starts. Depending
on your hardware equipment this process can take a few seconds up to one
minute.
Install by
Archive File
- Double-click
the file UltraLogon350.exe
- Wait until the UltraLogon installation-software starts. Depending
on your hardware equipment, this process
can take a few seconds up to one minute.
![]() The installation-software
detects already installed versions. If UltraLogon is already installed, the
version will be updated.
The installation-software
detects already installed versions. If UltraLogon is already installed, the
version will be updated.
![]() Make sure to
quit any running instances of UltraLogon before starting the installation
process. To do so, click the UltraLogon
Make sure to
quit any running instances of UltraLogon before starting the installation
process. To do so, click the UltraLogon ![]() icon in the taskbar
with the right mouse button and select Exit from the appearing menu.
icon in the taskbar
with the right mouse button and select Exit from the appearing menu.
Installation
Process
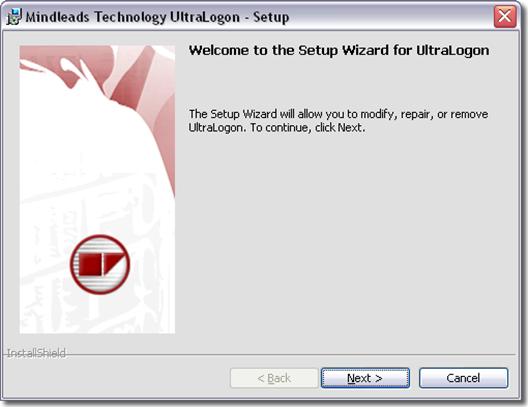
1. The window below appears. Click Next to start the installation.
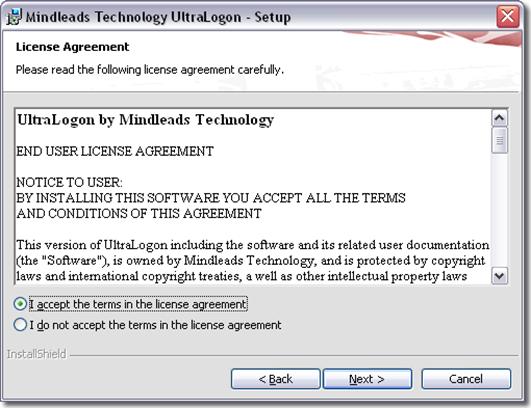
2. Carefully read the license agreement and select I accept the terms in the license agreement if you agree to the license conditions.
Click Next to continue.
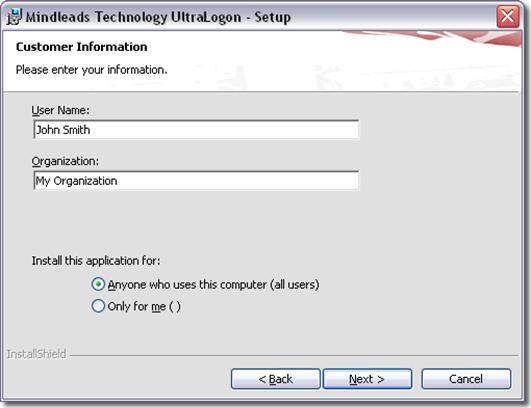
3. Enter your full name and organization in the text
boxes User Name and Organization.
Normally, UltraLogon is installed for all users.
Choose Only for me if you want to install UltraLogon only for
the currently logged-in user. This provides that the program-icon in the
start menu is not visible for other users.
Click Next to continue.
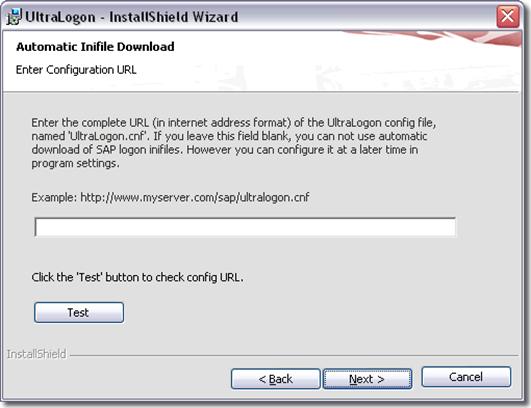
4. If UltraLogon is configured to make use of automatic
SAP Logon Ini file distribution, enter here the full qualified internet address
of UltraLogon configuration file ultralogon.cnf.
Click Test
to check the configuration file.
It is possible to configure automatic download of ini
files at a later time, in this case skip this step. This installation step is
primarily helpful for end user; in this manner they can configure an existing
configuration file.
Click Next
to continue.
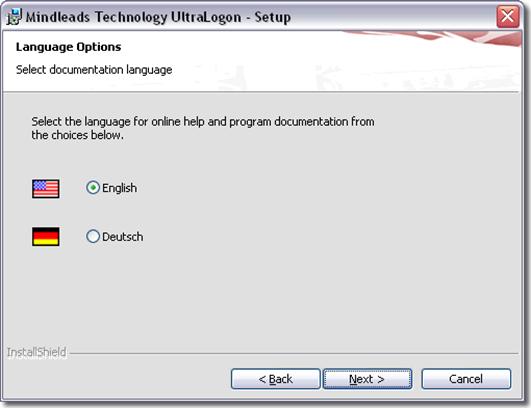
5. Select the language for program documentation and
online help. You can choose either English or German. This setting does not
affect the language of the program; it refers only to the documentation.
Click Next to continue.
6. You can change the directory in which UltraLogon will
be installed. The setup program suggests to install UltraLogon in your standard
program files folder.
In order to install UltraLogon in a different
directory, select Custom and enter
the path you prefer in the appearing window.
The installation software creates a program icon on
your desktop. Deactivate Create program
icon on desktop, if you don’t want a program icon on the desktop.
Click Next to continue.

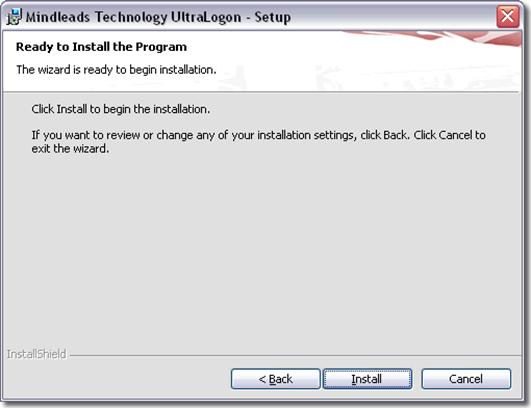
7. Click Install
to start copying the files. If the installation program indicates any running
program, try to close them.
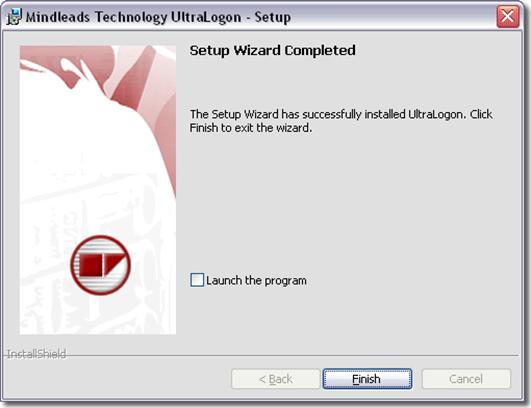
8. Wait until the installation has completed and click Finish.
In order to start UltraLogon immediately, enable the
check box Launch the program and
click Finish.
9. UltraLogon software is now installed. To complete the
installation, it may be necessary to restart your system. The installation
program will notify you if a system restart is required.
Getting Started
Before you start
using UltraLogon, we highly recommend to familiarize with the functions of the
toolbar. It enables you to navigate and handle UltraLogon very easily.
Icons Meaning
![]()
|
|
Quick
connect to a SAP system not listed (Quick
Connect) |
|
|
Refresh ini
file (Refresh) |
|
|
Change
views (Views) |
|
|
Open
favorites window (Favorites) |
|
|
Open
transaction browser (Transaction
Browser) |
|
|
Open ini
file editor (Ini file Editor) |
|
|
Program
Options (Options) |
UltraLogon Editor
Icons Meaning
![]()
|
|
Create new
ini file (New ini file) |
|
|
Open ini
file locally (Open ini file) |
|
|
Open ini
file from web server (Open ini file
from URL) |
|
|
Save ini
file locally (Save ini file) |
|
|
Save and
publish ini file to web server (Publish
ini file to web server) |
|
|
Cut SAP
system and copy to clipboard (Cut SAP
system) |
|
|
Copy to
clipboard (Copy SAP system) |
|
|
Paste
system (Paste SAP system) |
|
|
Delete
system (Delete SAP system) |
|
|
Move system
up (Move SAP system up) |
|
|
Move system
down (Move SAP system down) |
|
|
Disable
system (Disable SAP system / system
message) |
|
|
System
properties (Properties) |
|
|
Ini file
properties (General ini file properties) |
|
|
Connect (Connect to SAP system) |
|
|
Create or
edit configuration file (Ini file
groups) |
|
|
Program
Options (Options) |
Configure UltraLogon
Before you can start using UltraLogon, you need to
configure the program. To start UltraLogon, click the ![]() icon which has been
automatically installed on your desktop or select it from the start menu [START / Programs /
UltraLogon / UltraLogon].
icon which has been
automatically installed on your desktop or select it from the start menu [START / Programs /
UltraLogon / UltraLogon].
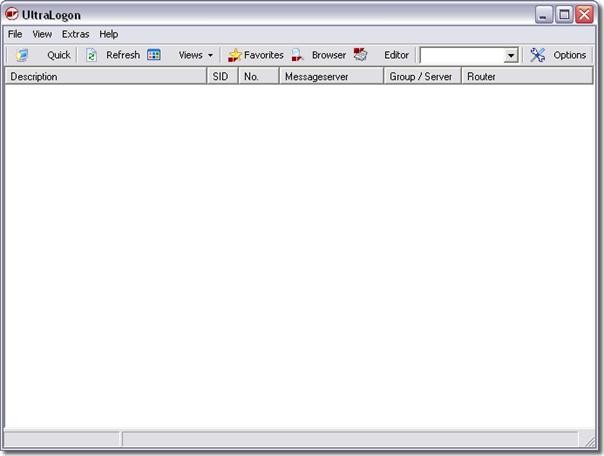
The UltraLogon main window appears:
Setup Ini Files
There are various ways to establish SAP Logon ini
files in UltraLogon. The best solution depends of the quantity of users in your
company.
1 – 10 User: Ini file stored on network drive
10 – 300 User: Ini file stored on web server
More than 300 User: Use UltraLogon configuration file
Several customers: Use
custom ini file setup
Ini File stored
locally or on network drive
Click Options
button or select in menu Extras the
menu item Options. The following
window appears:
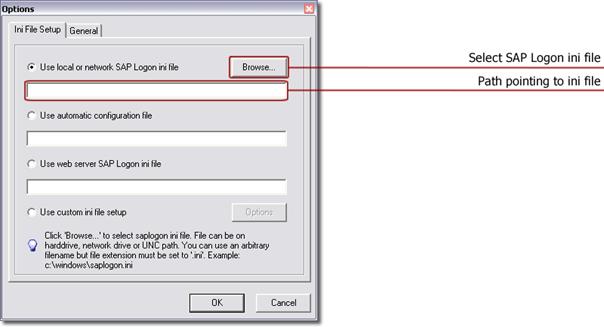
In order to use a locally or remotely stored SAP Logon
ini file click the Browse button. UNC
paths are also supported. Example:
UNC file: \\server\share\sapdata\saplogon_CRM.ini
Local file: C:\Windows\saplogon_CRM.ini
File on network drive : H:\Organization\sap\saplogon_CRM.ini
![]() If you choose a remotely stored ini file on network
drive, that file will be also stored by UltraLogon’s internal cache. The file
will be available even if the network drive is offline. However the ini file
can not be updated when network drive is not available.
If you choose a remotely stored ini file on network
drive, that file will be also stored by UltraLogon’s internal cache. The file
will be available even if the network drive is offline. However the ini file
can not be updated when network drive is not available.
![]()
Use the Browse button for easier navigation.
Ini
File stored on Web Server
Click Options
button or select in menu Extras the
menu item Options. The following
window appears:
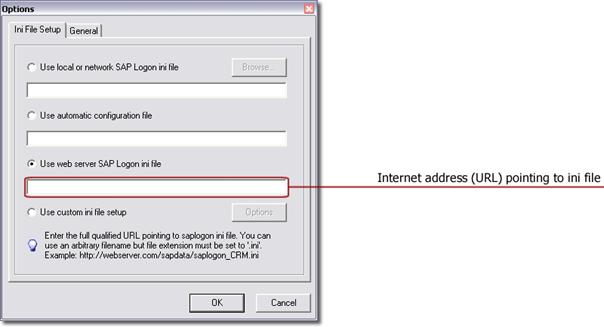
The desired SAP Logon ini file must be stored on a web
server. You can use any web server, such as Microsoft IIS or Apache for UNIX
operating systems.
Make sure Use
web server sap logon inifile is selected. Then enter the full qualified URL
in internet address format pointing to the SAP logon ini file.
Example: http://www.myserver.com/sap_ini/saplogon_CRM.ini
Click OK
button. Ini file will be automatically downloaded and displayed in the SAP
systems selection list.
![]() The selected ini file is also stored in the internal
cache of UltraLogon. If the web server is not available, the last used version
will be used. Every restart of UltraLogon causes a check if a newer version of
the SAP Logon ini file is available.
The selected ini file is also stored in the internal
cache of UltraLogon. If the web server is not available, the last used version
will be used. Every restart of UltraLogon causes a check if a newer version of
the SAP Logon ini file is available.
![]() If you store files on a web server running under UNIX
operating system, make sure to enter the correct internet address and filename
since it is case sensitive.
If you store files on a web server running under UNIX
operating system, make sure to enter the correct internet address and filename
since it is case sensitive.
Ini
File Group Configuration File
This is the most flexible solution to display SAP
Logon ini files. It offers the user a list of SAP systems to choose from. Each
ini file creates an own entry in the ini file group selection list.

In order to use this feature, UltraLogon configuration
file must be created. The configuration file has to be stored on a web server.
Create
UltraLogon Configuration File
You can use UltraLogon Editor in order to create
configuration file. Click the Editor
Button ![]() to start
UltraLogon Editor. Then follow instructions in chapter Ini File
Groups.
to start
UltraLogon Editor. Then follow instructions in chapter Ini File
Groups.
The Configuration file ultralogon.cnf created by Editor will be stored on webserver with
corresponding SAP Logon ini files. In UltraLogon, click the Options button or choose Options in Menu Extras. The following window appears:
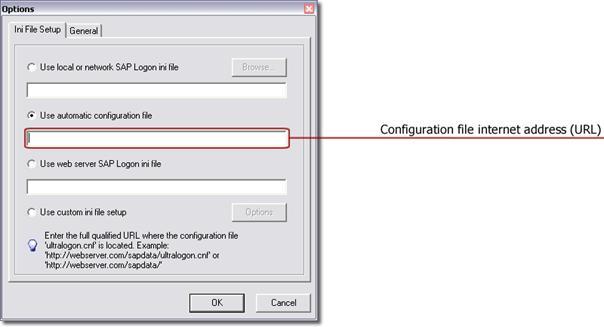
Enter the complete path in internet address format
(URL) pointing to the newly created UltraLogon configuration file. Example: http://myserver/sapdata/ultralogon.cnf. Click
OK button and check if all ini files
are displayed correctly in the ini file group selection list.
Custom
ini file setup
Using custom ini file setup allows you to load several
ini files from different sources. This is especially useful for users working
for several customers, like often SAP consultants do.
Klick the Options
button or select Options in menu Extras. The following window appears:
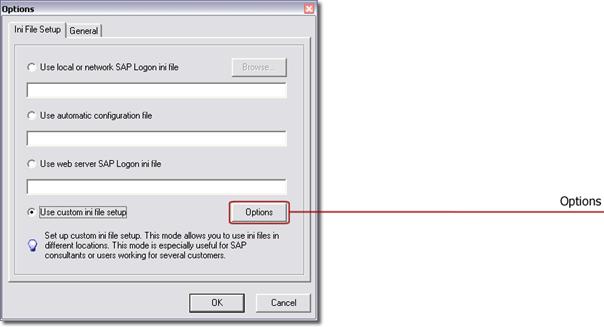
Select Use
custom ini file setup. Then click the Options
button.
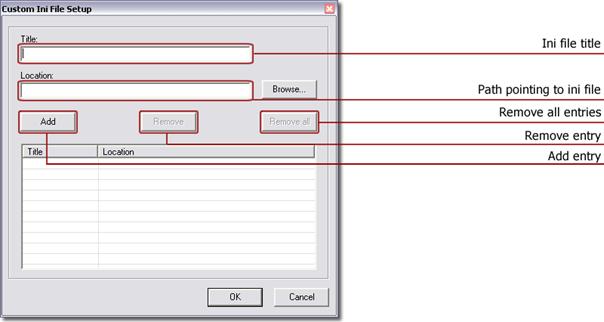
Enter a title that best describes ini file, then click
the Browse button and select your ini
file. Then click Add to add ini file
to list. You can add up to 100 ini files. Ini file does not have to be stored
locally; you can use network drives or UNC paths. UltraLogon stores ini file in
internal cache, thus ini file is available even network connection is down.
Click the OK
button then and check if all ini files are correctly loaded.
Using UltraLogon
UltraLogon offers various options to
display SAP systems. To start UltraLogon,
click the ![]() icon which has been automatically installed on your desktop or select it from the start menu [START / Programs / UltraLogon / UltraLogon].
icon which has been automatically installed on your desktop or select it from the start menu [START / Programs / UltraLogon / UltraLogon].
UltraLogon main window appears:
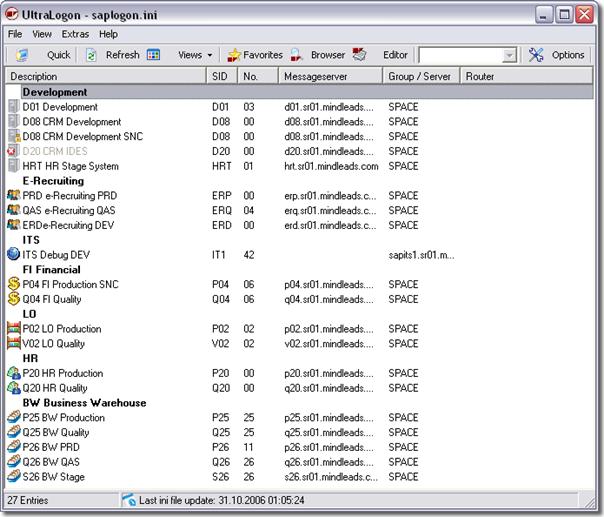
Status bar shows the last update of SAP Logon ini file. Appropriate
warning appears if ini file can not be updated.
To connect to the SAP system double-click the desired entry in the list.
Alternatively in menu File the entry Logon can be used. The connection to the
SAP system is done by using the locally installed SAPGUI.
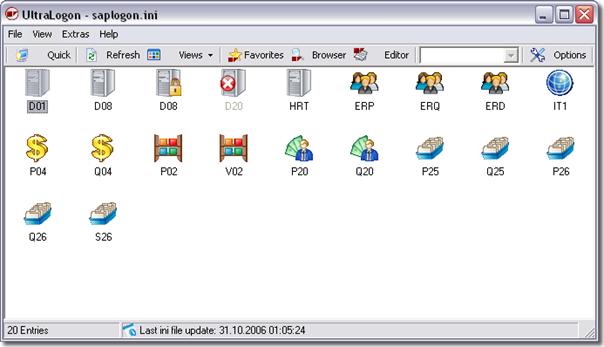
Change
System View
Use the Views button then
select Tiles to display SAP systems
with large icons.
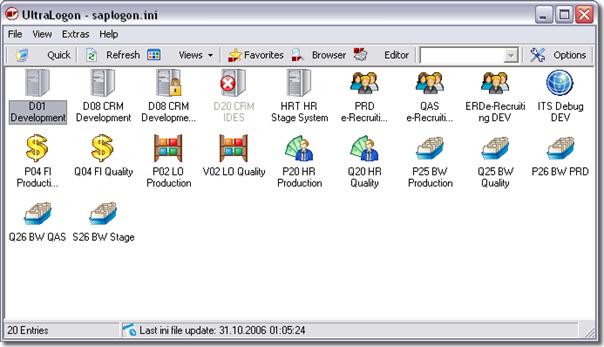
You can display SAP systems either by description or System ID (SID) /
Hostname. In order to change the description, use menu View, Icon Caption.
Example view with SID (System ID):
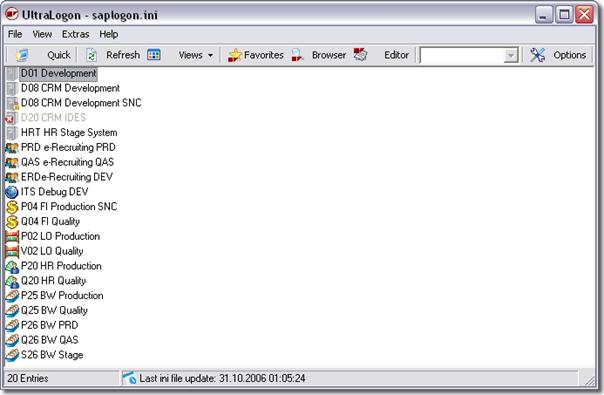
In order to display SAP systems using small icons, use the Views button and select Icons or choose Icons in menu View.
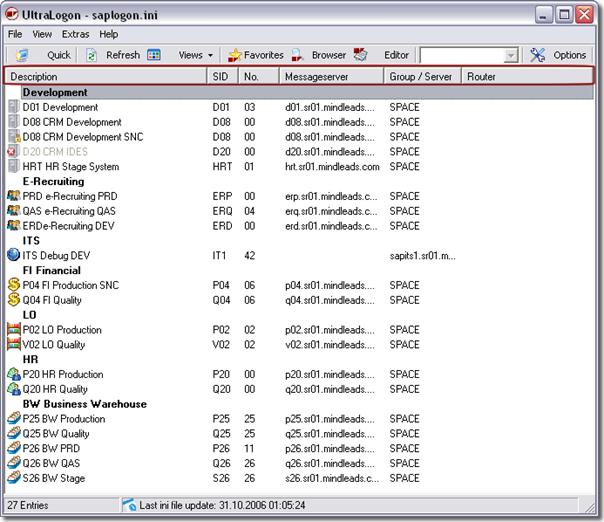
The detailed view shows all important system parameters similar to SAP
Logon program. Click the Views button
and select Details in order to
display detailed system view.
Use the column header to change the sort order. You can sort as- and
descending by Description, SID, Database
Number, Messageserver, Routerstring.
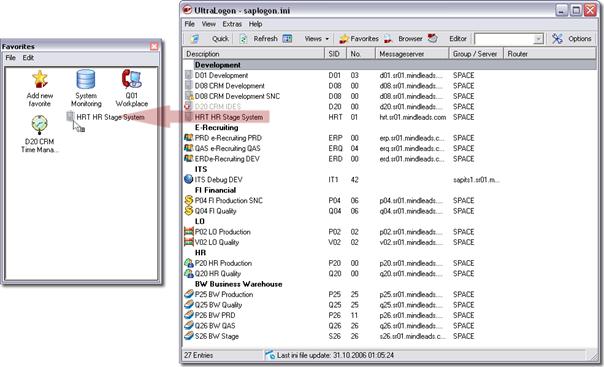
Create Favorites
Often used systems can be grouped using favorites. Favorites can be further
customized by adding login data, language, transaction, report or program to
start. You can create favorites using different ini files. Use the Favorites button ![]() in order to display favorites window.
in order to display favorites window.
Using drag and drop method a
SAP system can be extracted directly into the favorites window. Use menu Edit, Properties to customize favorite.
In order to create favorite
you can also use the Add new favorite
Icon in favorites window.
In default favorites view all
favorites are displayed – regardless of the selected ini file. In order to show
ini file dependent favorites, select Ini
File dependent in menu View.
Maintain
Favorites
UltraLogon includes numerous
for customizing favorites.
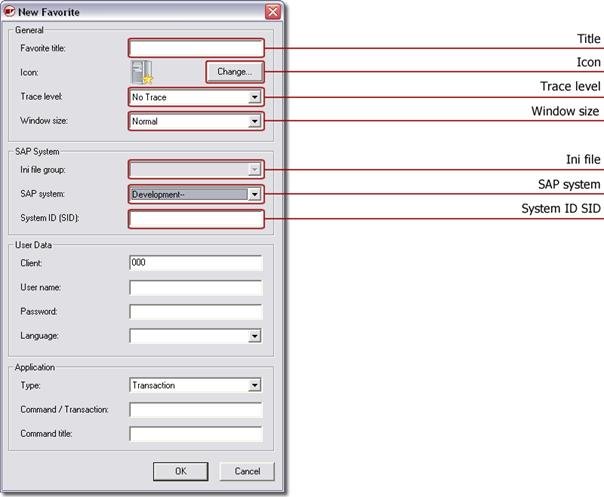
General
Settings
Title: Title of favorite.
Icon: Click Change in order to change display icon.
Trace level: Trace level used when connecting to SAP system.
Window size: Use default size or maximized SAP session window.
System Settings
Ini file: Select corresponding ini file in automatic
configuration file mode or custom ini file mode.
SAP system: SAP system used by favorite.
System ID SID: System ID SID is automatically recognized if ini file is
correctly maintained. SID must be manually entered if not maintained in ini
file.
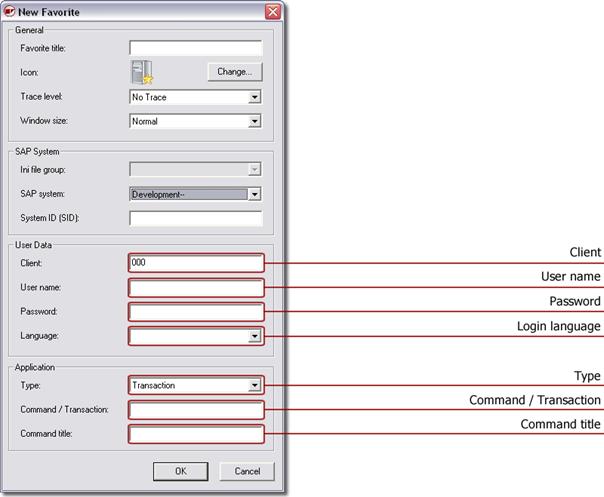
User Settings
Client: Login client. 3 numeric chars
required.
User name: Login
name.
Password: Password for Login name. If no password is entered,
password dialog will be displayed by SAPGUI.
Login
Language: Used login language for SAP system.
Application Settings
Type: Choose between Transaction,
Report or System Command.
Command / TA: Automatically starts transaction, report or system command. Type
of command is defined by dropdown list.
Command title: Title of function that will be displayed in login dialog.
Additional
Functions
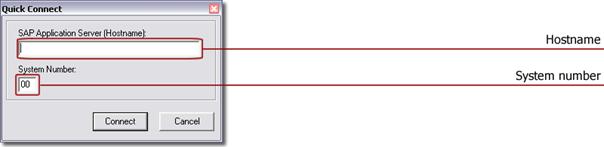
Quick Connect
Using Quick Connect allows a connect to a SAP system not included in ini
file. Click the Quick Connect Button ![]() .
.
Hostname: Hostname of SAP system (Application Server).
System number: System number of SAP System. Enter system number using 2 numeric
chars.
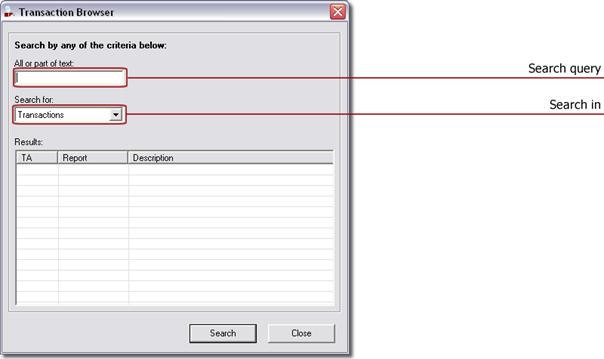
Transaction Browser
Using Transaction Browser allows a quick search for SAP transactions
codes or reports. In order to start transaction browser, click the Transaction Browser button ![]() . If you
enter for example sm as search query,
transaction browser displays all transaction codes including the chars sm. You can also search for reports or
transaction descriptions by selecting the corresponding entry in Search in.
. If you
enter for example sm as search query,
transaction browser displays all transaction codes including the chars sm. You can also search for reports or
transaction descriptions by selecting the corresponding entry in Search in.
Web Access
SAP systems configured for web
access can easily connected using web access feature. It is required to enable
web access in ini file Editor for the corresponding systems if you want to make
use of this feature. SAP systems with enabled web access feature appear in the Web access window then.
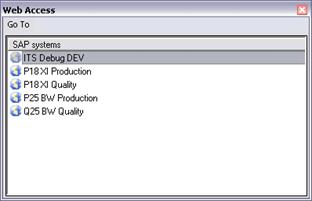
By right clicking SAP system a
context menu appears offering numerous web services:
·
BW Webreporting
·
XI Homepage
·
XI Repository
·
XI Directory
·
XI SLD
·
XI RWB
·
XI Exchange Profile
·
XI Adapter Monitor
·
XI Messaging Display
·
J2EE Homepage
·
J2EE System Monitoring
·
J2EE User Management
·
J2EE Netweaver Administrator
·
J2EE Web Services Navigator
·
J2EE UDDI Client
·
J2EE Web Dynpro
·
J2EE Content Administrator
·
J2EE Web Dynpro Console
The selection starts default
web browser. Access URL is automatically generated.
Ini File Editor
Integrated ini file editor
allows complete editing functions for SAP Logon ini files. Files created with
ini file editor are fully SAP Logon compatible, however a few functions are
only supported in connection with UltraLogon.
Click the Ini File Editor button ![]() , the
following window appears:
, the
following window appears:

Ini file editor loads the
currently loaded ini file of UltraLogon. If no ini file is loaded, an empty
editor window appears.
If changes have been made, ini
file must be saved. Then reload it in UltraLogon by pressing the F5 key. For
web based ini file setup the file must be published to web server to reflect
changes. Ini file editor automatically recognizes which ini file mode is used
in UltraLogon.
Edit SAP System
Double-click SAP system in
order to edit it.
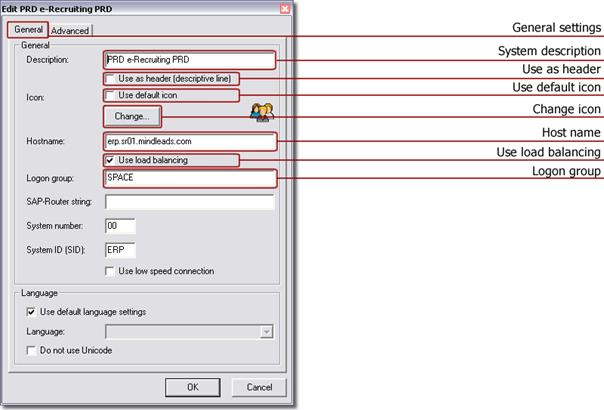
System Settings
System description: Description of SAP system.
Use as header: Using headers allows
to group SAP systems within ini file. Description of system appears then in
bold font. You can use headers to group SAP systems by its functions.
Use default icon: Default icon is used.
Deselect checkbox to change the display icon, and then click the Change button. Changing icons is only
supported in UltraLogon. However ini file remains compatible to SAP Logon.
Change icon: Display icon
selection window.
Host name: Host name of
application server. Either application server or message server can be entered.
You must enable load balancing when message server is entered.
Use load balancing: Requires a message server
in host name field.
Logon group: Used logon group if
load balancing is enabled. Default is SPACE.
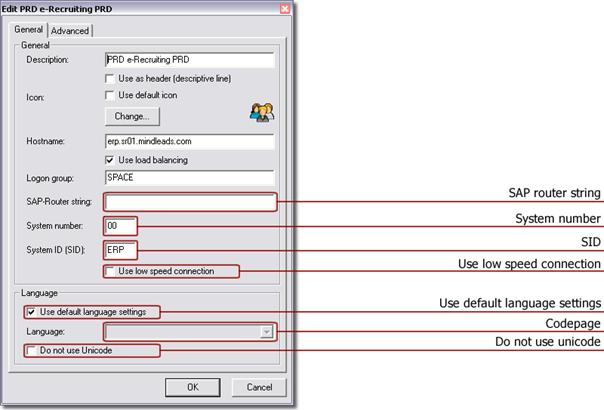
SAP router string: SAP router
string for connection with SAP system (optional).
System number: System number of SAP
system. Specify using two numeric chars.
SID: System ID (SID) of SAP
system. SID is a mandatory field. Specify SID using 3 chars.
Use low speed connection: Connect to SAP system using low
network bandwidth.
Language Settings
Use default language settings: Default codepage 1100 is used. If
checkbox is not selected, select desired codepage using language drop down
list. This setting does not have any effect on login language in SAPGUI dialog.
Codepage: Select
codepage if language settings are not set to default.
Do not use Unicode: If not selected, Unicode is
not used even if target system is a Unicode system.
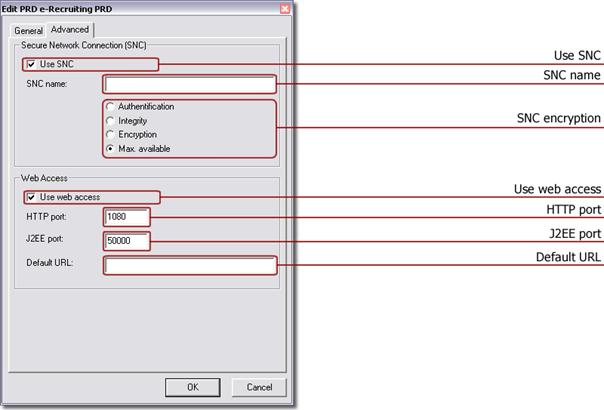
SNC Settings
Use SNC: Connection to
SAP System is done using secure network connection (SNC).
SNC name: SNC name used
for the connection to SAP system.
SNC encryption: SNC encryption level.
Web Access
Use web access: If enabled, the system
is listed in UltraLogon’s web access window. For the use of web access HTTP
port or J2EE port must be specified. Maintain ports according SAP system
settings.
HTTP port: Default value:
1080
J2EE port: Default value:
50000 + [system number] * 100
Default URL: Default URL that
is called by double-clicking a system in the web access window. Specify only
fully qualified URL. Example:
http://mysapsystem01:1080/sap/bsp/myapp/
Sort Systems
In order to change sort order
of SAP systems, use the buttons Move SAP
System up ![]() / Move SAP
System down
/ Move SAP
System down ![]() .
Alternatively use right mouse button on SAP system and select corresponding
action.
.
Alternatively use right mouse button on SAP system and select corresponding
action.
![]()
Keep in mind
that sort order is only maintained in UltraLogon. If SAP logon ini file is
opened with standard SAP Logon software, systems are alphabetically sorted.
Add, Copy, Delete Systems
As used in windows operating
system, you can use copy, cut, paste functions in order to edit SAP systems.
Use the corresponding buttons in the toolbar or the right mouse button context
menu on SAP system.
Disable Systems / System Message
You can use ini file editor to
temporarily disable a SAP system. For any logon attempt in UltraLogon a system
message will be displayed to the user. This is especially useful for system
maintenance work.
In order to disable a SAP
system, click the Disable System ![]() button.
button.
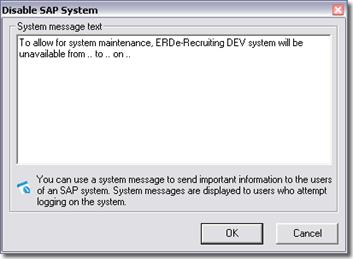
Edit example system message
according your needs. Then click the OK
button. After saving of ini file (web-based: publishing), the disabled system
is displayed in UltraLogon with appropriate icon.
In order to re-enable SAP
system, click Enable System in menu Edit.
Ini File
Properties
In order to edit general ini
file properties, click Ini file
properties in menu File. The
following window appears:
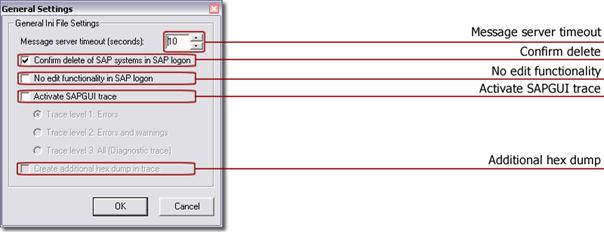
General ini file settings
affect all SAP systems in ini file. A few settings affect only standard SAP
Logon program. They are included for compatibility reasons.
Message server timeout: Specifies
how long client program waits for a response from the SAP system. Default value
is 10 seconds. If you experience repeated timeout connection errors, increase
this value.
Confirm delete: Displays
a warning before you can delete a system. This setting only affects standard SAP
Logon program.
No edit functionality: Prevent
logon entries from being changed. This setting only affects standard SAP Logon
program.
Activate SAPGUI trance: Define
and activate network trace (SAPGUI Trace). When you choose this option, you can
select desired trace level.
Additional hex dump: List
additional memory area in SAPGUI trace file. In order to create an additional
hex dump, trace level must be set to level 2 or higher.
Publish
Ini Files to Web Server
Configure Web Access
Edited ini file can be
published to web server using ini file editor. Before you can use this feature,
you must configure web access. In menu Extras,
click Options. The following window
appears:
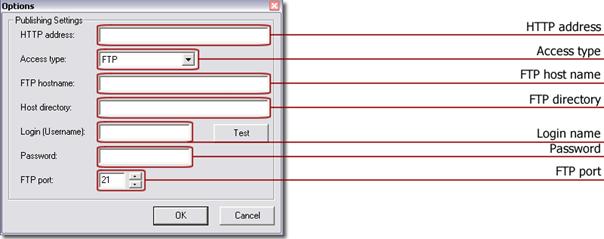
Access Types
You can access web server by
using either local / network or by using FTP protocol. If you choose local /
network select the correspondent directory using the folder icon ![]() .
.
HTTP address: Fully
qualified URL pointing to the location where ini files and/or configuration
file is stored. Example:
http://www.mindleads.com/sap/inifiles
FTP Access
FTP host name: Host
name of FTP server, without sub folders. Example:
www.mindleads.com
FTP directory: FTP
directory (Path after FTP host). Example:
/sap/data/inifiles
Login name / Password: Login
data for FTP connection. User must have write permissions.
FTP port: FTP
port. Default port is 21.
In order to test FTP
connection, click the Test button. If
an error occurs, FTP message output window opens automatically. If test
completes successfully, click OK to
close the window.
Publish Ini File
Click the Publish button ![]() to publish ini file to web server (upload). If
changes have been made to ini file, click Refresh
button
to publish ini file to web server (upload). If
changes have been made to ini file, click Refresh
button ![]() in UltraLogon to reflect changes.
in UltraLogon to reflect changes.
In order to show detailed FTP
transmission information, click Show FTP
Messages in menu Extras.
Ini File Groups
In ini file Editor, click the
ini file groups button ![]() . The
following window appears:
. The
following window appears:
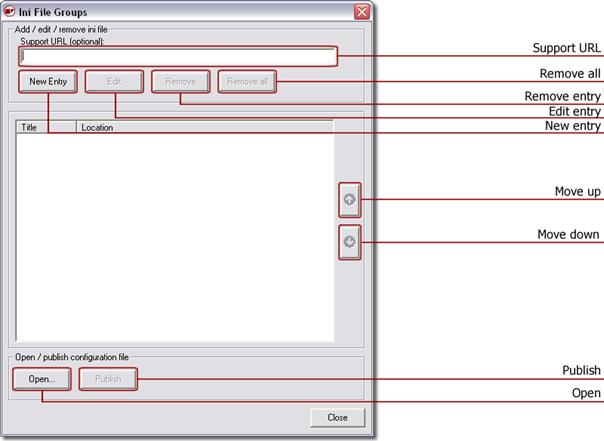
Click the Open button in order to open an existing configuration file from
web server. You are prompted to enter accordant URL. Example:
http://www.mindleads.com/sap/ini/ultralogon.cnf
Create Configuration File
In order to create a new ini
file entry, click the New button. The
following window appears:
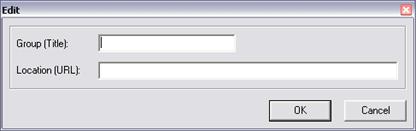
Enter an arbitrary title for
desired ini file in field Group.
Enter then the fully qualified URL pointing to ini file in field Location. Example:
http://www.mindleads.com/sap/ini/CRM_system.ini
Click OK to close window.
In field Support URL you can enter any URL that is helpful for user. Entered
URL will be displayed in UltraLogon if user requests help (F1 key or Support in menu Help)
After editing an existing
configuration file or after creation of a new one, file must be published
(uploaded) to web server. It is required that you have configured web access in
Options window. Click the Publish button to upload configuration
file ultralogon.cnf to web server.
After publishing, check if the
configuration file is correctly loaded. In menu File click Open configuration
file.
Additional options:
In order to prevent end users
to open Editor or options dialog, use the permissions settings ‚disable editor in UltraLogon‘ or ‚disable options in UltraLogon‘.
![]() After changing configuration file, UltraLogon must be
restarted to reflect changes. Clicking Refresh
button in UltraLogon does only re-download the currently loaded ini file, it
does not refresh configuration file.
After changing configuration file, UltraLogon must be
restarted to reflect changes. Clicking Refresh
button in UltraLogon does only re-download the currently loaded ini file, it
does not refresh configuration file.
![]()
Publishing
configuration file overwrites existing file. If you intend to use several
configuration files, save them in corresponding sub directories.
Program Options
Low Speed Connection
In order to set UltraLogon for
low speed network connection, use Low
Speed Connection in menu Extras. This
minimizes data traffic over the network.
Activate Trace Mode
You can activate local SAPGUI
trace by clicking using menu Tracelevel
in menu Extras. You can eighter
choose two different trace levels: Errors
and Warnings or Errors. Trace
file will be locally stored onto the Windows desktop. To disable trace mode,
select trace level None in menu Extras / Tracelevel.
General Options
In Extras menu, select the menu
entry Options. Then select the General tab.
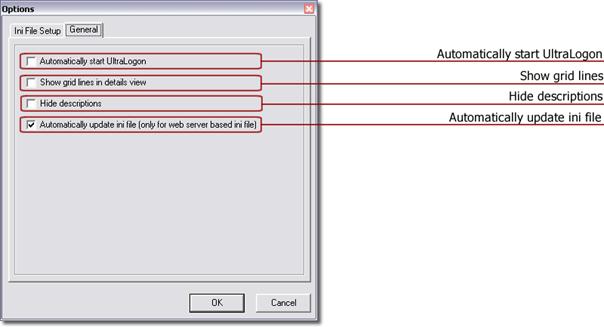
Automatically start UltraLogon
This option makes sure that UltraLogon automatically
starts after a user logon.
Show grid lines
Using this option additional grid lines are displayed.
It only has effect in details view.
Hide descriptions
If enabled descriptions are hidden. This option only
has effect in details view.
Automatically update ini file
When UltraLogon is set up to use web based ini files,
this option makes sure that ini file is automatically updated. UltraLogon
checks then periodically if a newer version of ini file is available on web
server. To enable this option, ini file must be stored on web server or
configuration using automatic configuration file ultralogon.cnf must be used.
Installation Notes for Administrators
There are several options for
distributing UltraLogon Software to PC clients.
If have configured UltraLogon
for use of the UltraLogon configuration file, you can instruct end user to
enter the configuration URL in the corresponding installation step. Example:

The configuration URL will be
saved then in the local registry.
If you intend to use a third
party software distribution product for installation of UltraLogon software,
only the file UltraLogon.exe with
corresponding desktop or start menu shortcut needs to be distributed. SAP Logon
ini file setting can be done by using command line options or registry entries.
Alternatively you can replace the file saplogon.exe
in SAPGUI installation package with UltraLogon.exe,
in this case modify the SAPGUI setup file setup.xml according your needs.
Technical
Information
Command Line Options
Usage:
UltraLogon.exe [INI-Type]=[Ini-File]
Ini-Type:
ConfigURL Set the configuration URL for use with
UltraLogon configuration file
FileURL Set URL of SAP Logon ini file on
webserver
FileLCL Locally
or on network drive saved ini file. Supports UNC paths.
Command Line Examples
Load UltraLogon
configuration file. File extension must be set to .conf. URL must be fully qualified in internet address format,
beginning with http://.
UltraLogon.exe
ConfigURL=http://server/sapdata/ultralogon.conf
Load SAP Logon ini
file from web server. File extension must be set to .ini. URL must be fully qualified in internet address format,
beginning with http://.
UltraLogon.exe
FileURL=http://server/sapdata/saplogon.ini
Load local SAP Logon
ini file.
UltraLogon.exe
FileLCL=C:\windows\saplogon.ini
Loads ini file from
net works drive with UNC path:
UltraLogon.exe
FileLCL=\\server\share\sapdata\saplogon.ini
Load the ini
file saplogon_CRM.ini with network
drive letter:
UltraLogon.exe
FileLCL=H:\sapdata\saplogon_CRM.ini
Required
Files
For a properly operation of UltraLogon, the following files are required
in the version listed below:
|
File name |
Path |
Version |
|
ULTRALOGON.EXE |
Installation folder |
3.5.0.x |
|
ULTRALOGONED.EXE |
Installation folder |
3.5.0.x |
|
ULAUTOUPD.EXE |
Installation folder |
3.0.0.28 |
|
TABROWSER.EXE |
Installation folder |
2.0.0.15 |
|
TALISTDE.DAT |
Installation folder |
- |
|
TALISTEN.DAT |
Installation folder |
- |
|
SHLWAPI.DLL |
Installation folder |
6.0.2800.1400* |
|
WININET.DLL |
Installation folder |
6.0.2800.1405* |
|
MSVBVM60.DLL |
System folder |
6.0.97.82 |
|
OLEAUT32.DLL |
System folder |
2.40.4522.0 |
|
OLEPRO32.DLL |
System folder |
5.0.4522.0 |
|
ASYCFILT.DLL |
System folder |
2.40.4522.0 |
|
STDOLE2.TLB |
System folder |
2.40.4522.0 |
|
COMCAT.DLL |
System folder |
5.0.2195.1 |
* According to the version of Internet Explorer,
these files can be different in version; they should be higher than 4.0.x
though.
Registry
Settings
Key:
HKEY_LOCAL_MACHINE\Software\Mindleads Technology\UltraLogon\ConfigURL
Format: <URL>
Default:
Type: REG_SZ
This registry entry sets the URL of UltraLogon
configuration file, which is required for use with ini file selection group.
Since the key is stored in HKEY_LOCAL_MACHINE , it will affect all users.
Key:
HKEY_CURRENT_USER\Software\Mindleads Technology\UltraLogon\ConfigURL
Format: <URL>
Default:
Type: REG_SZ
This registry entry sets the URL of UltraLogon
configuration file, which is required for use with ini file selection group.
Since the key is stored in HKEY_CURRENT_USER, it will affect only the currently
logged on user. UltraLogon considers at startup both keys, HKEY_LOCAL_MACHINE
and HKEY_CURRENT_USER, however the entry in HKEY_CURRENT_USER has priority.
Thus users without computer administrator rights can modify the setting itself.
Key:
HKEY_CURRENT_USER\Software\Mindleads Technology\UltraLogon\WebInifile
Format: <URL>
Default:
Type: REG_SZ
Sets the complete path pointing to the SAP Logon ini
file in internet address format (URL) stored on web server. Modifying this key
does not require computer administration rights.
Key:
HKEY_CURRENT_USER\Software\Mindleads Technology\UltraLogon\LocalInifile
Format: <URL>
Default:
Type: REG_SZ
Sets the complete path pointing to a locally or
remotely stored SAP Logon ini file (Network drive letter or UNC paths are
supported). Modifying this key does not require computer administration rights.
Key:
HKEY_CURRENT_USER\Software\Mindleads Technology\UltraLogon\UpdateDelay
Format: <Numeric value between 5 and 300>
Default: 50
Type: REG_DWORD
If automatic update of ini file is enabled, this entry
sets the periodicity in minutes. UltraLogon checks then each n minutes, if a
newer ini file exists. Measurement unit is minutes.